• HOME
  • ABOUT
  • BLOG
  • CONTACT
  • FEATURES
  • PARTIES I LINK TO

Nannycraft4u

Make your handmade dreams a reality - Just ask Nanny!

  • CHARITY PROJECTS
  • TUTORIALS
    • BAGS,POUCHES,ROLLS,WALLETS
    • EMBROIDERY
    • HOME/DECOR
    • LET’S SEW
    • QUILTING TUTORIALS
    • SPIN THE PINS
    • TOYS
    • WOTZA WEDNESDAY
  • SEWING/QUILTING
    • SIMPLE PROJECTS
    • TIPS & TOOLS
  • RECIPES
  • NANNY CHAT
  • NANNY & POPPY PROJECTS
    • CRAFT ROOM
    • HOUSE
    • TRAVEL
Home » NANNY CHAT » Page 3

Fruit Nut Balls

December 10, 2015 by Nanny Leave a Comment

Just to show that not everything in the Nanny household is made with condensed milk I thought I would share the Fruit Nut Balls that we make.  These are a great activity (supervised) for  children – fun to make and taste great too!

What you need:

1 cup dried fruit medley

3/4 cup raisins

1/2 cup chopped dates

1/2 cup boiling water

1 cup skim milk powder

1/2 cup chopped nuts

1/4 cup coconut

coconut extra for rolling

What you do:

  1. Take a bowl and add the dried fruit medley,raisins and dates.

FruitNutBalls1


2.  Add the boiling water and leave for about 15 minutes.

FruitNutBalls2


3.  Add the skim milk powder, chopped nuts and coconut and mix well

FruitNutBalls3


4.  Roll into small balls (about a large teaspoon) and roll in coconut

FruitNutBalls4


5.  Chill before serving

FruitNutBalls5


This made 36 – if you make these Fruit Nut Balls, have supplies on hand because you will want to make more!!

I’m off to make a Christmas pudding – I’ll show you that tomorrow!

Until next time

Nanny xx

Please share:

  • Share on Facebook (Opens in new window) Facebook
  • Email a link to a friend (Opens in new window) Email
  • Share on X (Opens in new window) X
  • Share on Pinterest (Opens in new window) Pinterest

Filed Under: NANNY CHAT, RECIPES Tagged With: FruitNutBalls, Gluten Free, Simple recipes

Easiest Chocolate Fudge

December 9, 2015 by Nanny Leave a Comment

This would have to be the easiest Chocolate Fudge ever!

What you need:

550g dark chocolate – I used chips because that’s what I had – choose a good quality chocolate

395g can condensed milk

1 cup chopped walnuts

vanilla to taste

What you do:

  1. Line a lamington tray (or similar) with aluminium foil

Easiest Chocolate Fudge 1


2. Put the chocolate and condensed milk in a saucepan and melt over low heat.

Easiest Chocolate Fudge2


3.  Add the walnuts and vanilla

Easiest Chocolate Fudge 3 (2)


4. Spread in the tray and pop in the fridge till firm

Easiest Chocolate Fudge 4 (2)


5,  Remove from fridge – turn out and remove foil

Easiest Chocolate Fudge 5


5. Cut into desired shape – I tried triangles (Xmas trees??)

Easiest Chocolate Fudge


How easy was that!!

I think we will try fruit balls next and then if you have never made your Christmas pudding in the microwave,  you are going to love that one!

Until next time

Nanny xx

Please share:

  • Share on Facebook (Opens in new window) Facebook
  • Email a link to a friend (Opens in new window) Email
  • Share on X (Opens in new window) X
  • Share on Pinterest (Opens in new window) Pinterest

Filed Under: NANNY CHAT, RECIPES Tagged With: Easiest Chocolate Fudge, Simple recipes

Gluten Free Chocolate Balls

December 8, 2015 by Nanny Leave a Comment

I thought I would share some of the treats we like to have at  Christmas – these have been a part of our Christmas for so long I have no idea where the recipes came from originally but, as they are so basic, I am sure many folks will have made similar things in their homes . We have adapted them over the years so that Poppy, who is a Coeliac, can enjoy them too.  So let’s start with  our Gluten Free Chocolate Balls.  These are so easy to make but you will have to be in charge of stopping eating them once you start!

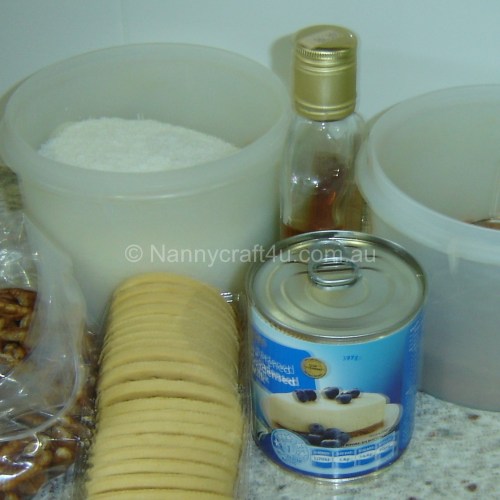
What you need:

DSC06053


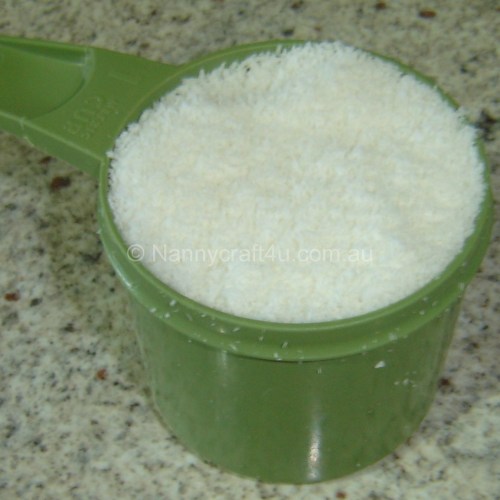
1 cup Coconut

1.5 tablespoons of Cocoa

1 cup chopped Pecans

250g Gluten Free plain biscuits

395g can Condensed milk (use the light if you are concerned)

Brandy or rum or ……… to taste

This makes a whole lot depending on the size you like – I made these larger than I would normally (my back was hurting) and made about 36.

This is one of those easy, all in together recipes so let’s do it!

What you do:

  1.  Crush the biscuits
  2. DSC06056


2.  Now add to a bowl with coconut

DSC06054


cocoa

DSC06058


pecans

DSC06055


condensed milk

DSC06057


DSC06059


Stir and add the brandy or rum or ….. to taste

DSC06060


Roll into small balls and roll in coconut

DSC06061


I told you they were easy!

Gluten Free Chocolate Balls


Enjoy!!!  Tomorrow I will share our easy fudge.  🙂

Until next time

Nanny xx

Please share:

  • Share on Facebook (Opens in new window) Facebook
  • Email a link to a friend (Opens in new window) Email
  • Share on X (Opens in new window) X
  • Share on Pinterest (Opens in new window) Pinterest

Filed Under: NANNY CHAT, RECIPES Tagged With: Gluten Free, Gluten Free Chocolate Balls, Simple recipes, Xmas treats

Nanny’s Birthday Surprise

December 5, 2015 by Nanny 10 Comments

Just under two years ago, I received a wonderful gift!  Without my knowledge, two of my on-line friends (never met) organised a Nanny’s Birthday Surprise.

Wendy and Ineke set up a facebook page , blocked me so that I couldn’t see  and they were off and running!  They decided to send me 9 patch blocks in my favourite colour – purple, and they rallied others to join them.  On my birthday, these envelopes started to arrive and to say I was overwhelmed would be an understatement!

DSC04921

Over the days following my birthday, the mailman kept calling and I received beautiful cards with words of friendship from people I didn’t know and each contained at least one 9 patch block.  A couple didn’t have time to make a block and so sent me the fabric squares and one member was in New Zealand, away from her sewing gear and so sent me a purple NZ bag and silver fern badge.  This bag held all of the blocks and cards while I tried to plan.

DSC04922


DSC04923


DSC04924

Ineke included two ‘special’ blocks – a heart and a bee ( the members of my Nanny Swapz call me Queen Bee)

DSC06076

DSC06077

I spread them all out to show the group what I had received:

DSC04925

Then the time just seemed to slip by as life kept ‘intruding’ in on my sewing plans!  I worried that I wasn’t getting my quilt done and more time passed me by.

I played with the blocks, put them back in my purple NZ bag, played with them some more and finally decided to organise them into groups of four.  I tried to look at colour values ie light and dark and also tried to spread the splashes of yellow to give balance.  I then decided to make the blocks the heroes of the quilt, I needed a light sashing with a medium corner block.

I loved how it all came together – Lorraine had sent me three blocks so they became corner blocks and the Happy Birthday block from Heather was perfect for the other corner!

DSC06074

DSC06075

and I was soon searching for a suitable backing.

With the backing sorted, I still wasn’t finished – I still had the fabric squares and a mugmat sent by Mary.  I decided to contact Mary and asked if I could incorporate the mugmat into the quilt and Mary was most generous and gave me the Ok to undo the mugmat or to do whatever I liked . The mugmat became the feature on the back of the quilt where I wanted to acknowledge all of the contributors.  I decide to do this by embroidering all of the names around the mugmat top, separated by the pansies from the back of the mugmat and to me it was ‘perfect’!

DSC06071

I then cut up the fabric squares and made two smaller 9 patch blocks which I decided to  set  on point.  I had now succeeded in using all of my gifts in the creation of my quilt and I was so excited!

pansy

It was now time to pin!

DSC06049

For the quilting, I decided to ‘eyeball’ diagonals on the 9 patches and stitch in the ditch to preserve Ineke’s blocks and Clare’s pansy block.

I thought I would use the backing fabric for the binding as well but it looked dreadful so off to the stash!  I found a pack of  purple 2.5″ strips that I received as Queen in one of the ‘hives’ we had run at Nanny Swapz and would you believe that it matched a fabric used by one of the quilters in the making of the 9 patch blocks??  Perfect!!!

My good friend Sue then offered – no insisted – that she would love to hand stitch the binding for me and my quilt was done!

DSC06069


DSC06070

To Wendy and Ineke –  Thank You!!  To all of the wonderful women who took the time to do this for me – Thank You!!  I apologise for the time delay but hope that you like what I finally came up with in my Nanny’s Birthday Surprise Quilt.

It certainly was a birthday that I will never forget – I was truly humbled by your gestures of friendship

and my wish is that one day I might get to thank each of you in person!

Until next time

Nanny xx


Please share:

  • Share on Facebook (Opens in new window) Facebook
  • Email a link to a friend (Opens in new window) Email
  • Share on X (Opens in new window) X
  • Share on Pinterest (Opens in new window) Pinterest

Filed Under: NANNY CHAT Tagged With: 9 patch, friendship, Nanny's Birthday Surprise, Purple Quilt

Gluten Free Tuna Slice

December 2, 2015 by Nanny 4 Comments

With the warm weather upon us in Australia, I thought I would share a quick, easy recipe that can be eaten hot or cold – a Gluten Free Tuna Slice.  This is a great recipe to make with the children!

What you need:

DSC06038


125g 0r 1.25 pkts of  rice crackers

1 cup of milk

120g of  cheese

1 medium onion

3 eggs

425g tin of tuna

What you do:

This is one of those wonderful recipes where you prepare everything first and then bundle it all together

So

  1. Crush the rice crackers in a bowl

DSC06037


2. Take 3 eggs and beat lightly

DSC06040


3. Measure out a cup of milk

DSC06039


4,  Grate the cheese

DSC06052


5.  Dice the onion

onion


6.  Open the tuna, drain and break up a bit with a fork

tuna


7.  Put everything into the bowl with the crackers

DSC06042


8. Mix to combine

DSC06043


9.  Spread into a tray – I line it with baking paper

DSC06044


10.  Bake in a moderate oven (175) for 45 minutes or until golden.

DSC06045


Squeeze fresh lemon juice over the slice while it is hot.

This is the ‘base’ recipe but of course you can add other things like some fresh herbs, grated carrot or zucchini or even some corn kernels.  It slices well, is great served hot with vegetables or cold with a nice green salad and some cherry tomatoes, and it travels well so is perfect for a picnic!

I hope you enjoy the Gluten Free Tuna Slice

Until next time

Nanny xx

Please share:

  • Share on Facebook (Opens in new window) Facebook
  • Email a link to a friend (Opens in new window) Email
  • Share on X (Opens in new window) X
  • Share on Pinterest (Opens in new window) Pinterest

Filed Under: NANNY CHAT, RECIPES Tagged With: Gluten Free, Recipe, Tuna Slice

  • « Previous Page
  • 1
  • 2
  • 3
  • 4
  • 5
  • …
  • 19
  • Next Page »

Welcome!

Welcome! I am Nanny and this is where I like to share my crafting as well as other snippets of our life in Australia. Read more

Social

Follow me on:

Like a Newsletter?

My Button4u

grab button for Nannycraft4u
<div class="nannycraft4u-button" style="width: 150px; margin: 0 auto;"> <a href="http://www.nannycraft4u.com.au" rel="nofollow"> <img src="http://i1168.photobucket.com/albums/r482/Nannycraft4u/logo8-001.jpg" alt="Nannycraft4u" width="150" height="150" /> </a> </div>

Looking for something?

Australian Women Bloggers Directory by Blog Chicks

Subscribe to Blog via Email

Enter your email address to subscribe to this blog and receive notifications of new posts by email.

Follow on Facebook

Follow on Facebook

Favourites

  • Let's Sew 23 - How to make a simple Library Tote
    Let's Sew 23 - How to make a simple Library Tote
  • Curtain Tie Backs
    Curtain Tie Backs
  • Make a lined,ruffle top, drawstring bag.
    Make a lined,ruffle top, drawstring bag.
[instagram-feed]

Meta

  • Log in
  • Entries feed
  • Comments feed
  • WordPress.org

© Nannycraft4u

All content and images belong to Nannycraft4u unless otherwise indicated. You are welcome to link back to my blog, but you may not copy whole posts, tutorials or photos without my permission. Please give credit for my work and link back to the original post at Nannycraft4u.com If you use one of my ideas, I would love to know about it. Designs and tutorials are for personal use only.

Copyright © 2026 · Lifestyle Pro Theme on Genesis Framework · WordPress · Log in