• HOME
  • ABOUT
  • BLOG
  • CONTACT
  • FEATURES
  • PARTIES I LINK TO

Nannycraft4u

Make your handmade dreams a reality - Just ask Nanny!

  • CHARITY PROJECTS
  • TUTORIALS
    • BAGS,POUCHES,ROLLS,WALLETS
    • EMBROIDERY
    • HOME/DECOR
    • LET’S SEW
    • QUILTING TUTORIALS
    • SPIN THE PINS
    • TOYS
    • WOTZA WEDNESDAY
  • SEWING/QUILTING
    • SIMPLE PROJECTS
    • TIPS & TOOLS
  • RECIPES
  • NANNY CHAT
  • NANNY & POPPY PROJECTS
    • CRAFT ROOM
    • HOUSE
    • TRAVEL
Home » NANNY CHAT » Page 5

Candlewicking Adventure – How to Make a Colonial Knot

October 19, 2015 by Nanny 8 Comments

Some time ago I told you about my wonderful gift and how it has started me off on a Candlewicking adventure and so I thought it time to check in and show you my progress and show you my Candlewicking Adventure –  How to Make a Colonial Knot.

I have no order to follow with the blocks so just selected one and popped it in the hoop!

Now for those of you not familiar with the process of Candlewicking, it is simply a series of knots!  The pre-traced blocks look like this:

DSC06012

This is my third block’

Each little dot is where you make a knot and the closed lines are where I will be doing a backstitch.  The little  flowers are to be daisy stitch.

The knot is called a Colonial Knot and after a lot of searching and reading, I tried to follow a description of starting but found it too difficult so decided to use Nanny’s way of doing things and it is working fine.

I start off with a length of thread and bring my needle up from under the block into one of the dots – I have been coming up right on one edge of the dot.

DSC06013

You then wind the thread around the needle in a figure 8 – so first this way (do this by holding the thread in one hand and moving the needle over and under)

DSC06014

and then this way

DSC06015

I then insert the needle back down through the other side of the dot (you don’t want to go back down the same hole you came up from as there would be a possibility of the knot being pulled through)

DSC06016

You can see me pulling the thread so the knot forms down at the bottom of the needle.


DSC06017

You need to hold the thread taut as you pull the needle through to get uniform knots.

When my thread is nearing the end I take it to the back, insert it under the last stitch and tie it off and then weave it back along the row a bit. It is then ready to be trimmed.  I need to go back and do the same with the start of my thread as well.

This is the first block I finished

IMG_0071

I love how it looks and couldn’t wait to start on Block 2 and I have now completed block 2 as well!
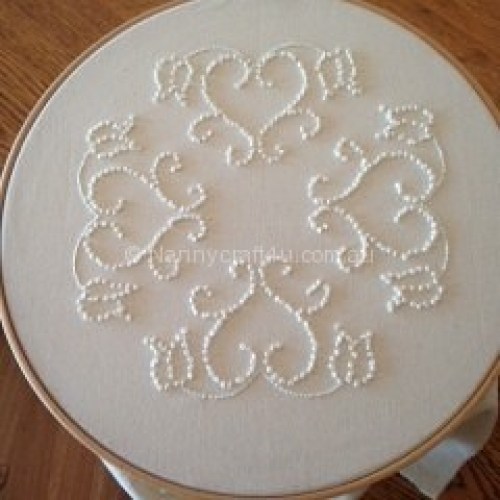
IMG_0171

I find this process really relaxing and it is something I can do at night (in front of the telly) quite comfortably as the hoop just sits on my lap.  Do you have a ‘switch off’ activity? What do you like to do ‘in front of the telly’?

I would love to hear from you (so I know I’m not chatting to myself) so please leave a comment.  I love it when you do and I will always reply just as soon as I can.

Until next time

Nanny xx


Please share:

  • Share on Facebook (Opens in new window) Facebook
  • Email a link to a friend (Opens in new window) Email
  • Share on X (Opens in new window) X
  • Share on Pinterest (Opens in new window) Pinterest

Filed Under: EMBROIDERY, NANNY CHAT Tagged With: Candlewicking, Colonial Knot, long term project, nannycraft4u

Make a Design Board

October 11, 2015 by Nanny 11 Comments

GnomeAngel.com

Hi!

This is something I am going to be using constantly while making my Farmer’s Wife 1930’s quilt so I thought I would show you how easy it is to make a Design Board.

What you need:

An art canvas – pick one up for a couple of dollars.  Mine is 12″ x 12″

A scrap of cotton wadding

A staple gun

DSC06004

Let’s do it!

  1.  Place the wadding on a hard surface and place the canvas upside down on top of it.  Fold the wadding up and over the edge and staple it.

DSC06005

2.  When you get to the corner, just cut a piece out to reduce the bulk

DSC06006

3.  Fold the corner and keep stapling

DSC06007

4.  That’s it – all done!

Here is mine with my latest block all set out ready to go to the machine

DSC06009

and look –  you can even turn it upside down and the pieces don’t fall off!

DSC06011


They won’t even end up on the floor if someone opens the door and the wind rushes in!

It is really something to think about if you don’t have one as it literally only takes minutes to make and it can it save you a lot of grief.  It doesn’t take up much space next to your machine and you can easily see that you are joining the right pieces!

I’d love to know if you think you will make a design board too!

Until next time

Nanny xx

Please share:

  • Share on Facebook (Opens in new window) Facebook
  • Email a link to a friend (Opens in new window) Email
  • Share on X (Opens in new window) X
  • Share on Pinterest (Opens in new window) Pinterest

Filed Under: CRAFT ROOM, NANNY CHAT, TIPS/TOOLS Tagged With: Make a Design Board, quilting, The Farmer's Wife 1930s Sew Along, Tips and Tools

The Farmer’s Wife 1930s Sew Along!

October 2, 2015 by Nanny Leave a Comment

GnomeAngel.com

I have decided to join a Sew Along!!  It is The Farmer’s Wife 1930s Sew Along that is being organised by Gnome Angel using the book  ‘The Farmer’s Wife’ 1930s Sampler Quilt by Laurie Aaron Hird.  You can see details here if you are interested in joining!  The aim is to make a total of 99 blocks over the next year – 2 each week.

DSC05979

I decided to do this for a number of reasons:

  • I love to read and the book is full of ‘inspiring letters from the women of the Great Depression’
  • I have always been in awe of women of yesteryear – the way they used everything and created beauty from within with so little.  We take so much for granted as we sit in our designated sewing areas with our modern machines and tools.  I love that this is an opportunity to reflect on this and to feel a oneness with these women as we, the women of today, create the blocks ‘that honour them’
  • I love the idea of women all over the world sharing this experience – the facebook page that was set up for the Sew Along now has  3, 894 members!!
  • I love to learn and see this as a great learning experience.
  • I liked the idea of having a big project broken down into achievable steps – especially when someone else has done it for me
  • I love that it is bringing together quilters of all ages. levels of experience and languages
  • I have never made a quilt for ME – I have gifted all of my quilts – who knows, I might just keep this one!

The fabric choice for the Sew Along is a personal one – some are making the quilt using one designers range, others are using mixed fabrics from their stash, some are going ‘modern’ and some are using 1930’s reproduction fabrics.

I decided that I wanted to go with the 1930 reproduction fabrics as I really want to  immerse myself into the ‘feel’ of the era .

I have some ‘Everything but the Kitchen Sink’ from RJR Fabrics

Everything but the kitchen sink 2010 RJR

Some ‘Feedsack’ by Sarah Morgan for Blue Hill Fabrics

Feedsack by Sara Morgan for Blue Hill fabrics

and some ‘old New Fabric Collection 30’s’ from Lecien

Old New Fabric Collection 30s Lecien

Then a friend decided to ‘destash’  40 x 7″  30s squares

DSC05980

and I added some Moda ‘Bella Solids 30’s’
DSC05981

I will add some more solids as more blocks are made.

I will share my progress as I go.  I will be aiming to keep up with the two blocks every week so wish me luck!

Until next time

Nanny xx

Please share:

  • Share on Facebook (Opens in new window) Facebook
  • Email a link to a friend (Opens in new window) Email
  • Share on X (Opens in new window) X
  • Share on Pinterest (Opens in new window) Pinterest

Filed Under: NANNY CHAT Tagged With: nannycraft4u, quilt blocks, The Farmer's Wife 1930s Sew Along

‘Dream to Achieve’ – Binding the Quilt

September 16, 2015 by Nanny Leave a Comment

alans pen logo

Logo for Margie done

'Dream to Achieve' I'm Quilting Along With Nanny
‘


Well here we are at the final step in our quiltalong ‘Dream to Achieve’ – Binding the Quilt!

So let’s get started!

  1. Trim the quilt

Take your quilt, and trim to the edge of your sashing , checking the square of your corners.  They should be pretty spot on as we have been checking along the way!

DSC05930

I use my square rule for the corner and then my long one to continue down the sides

DSC05931


2.  Prepare the binding

Take your fabric for binding and cut it into 2.5″ strips selvedge to selvedge – you will get 8 cuts from your 0.5m

3.  Join the binding strips

Take two strips and place as shown

DSC05929

Stitch along the line shown with my rule, trim and press.

Continue to join all strips in this manner and then press in half

IMG_0133

4. Adding the binding

Take the end, open it and cut at 45 degree angle

Now, leaving about 6″ of binding free, and starting along one of the sides (not at a corner),stitch the binding to the wrong side of the quilt (this is to stitch your binding by machine – if you prefer to do it by hand you will stitch to the front)

When you reach the corner, stop 1/4″ from the end and turn and stitch out to the corner (I apologise that my machine light has reflected here but if you see the last stitch the stitches then go up at 45 degrees to the top right)  Sort of like this ——–/ Remove from the machine.

DSC05932


Fold the binding up towards the machine (Your angled finish will help get this)   The photo I took of that step is not clear enough so will use one from another quilt to demonstrate

DSC04383

Then fold the binding back down along the next side until the fold is level with the side just sewn (I have pinned it to take the photo)

DSC04384

Starting at the edge, you then stitch along this side up to the next corner and repeat.

5.  Joining the ends of the binding

When you get about 8 – 10″ from the start, do some reverse stitches and finish off and remove from your machine.

DSC05934


The start is on the left.  Open the start end

DSC05935


and lay the other end into the opening

DSC05936


Now mark where they meet – I will mark it with this pin so you can see as this fabric is tricky!

DSC05937


Take that end away from the quilt

DSC05938


Open it up and using your 45 degree on your rule

DSC05939

Mark along the rule

DSC05940


Then put another mark 0.5″ to the left of the first mark (this is the seam allowance)

DSC05941

Cut along that line – the one closest to the end (you will still have the first line on your binding)

DSC05942

Now join the ends, finger press, fold in half  and it will fit perfectly!!  Complete sewing the binding.

DSC05933

6.  Press

Press the binding away from the quilt.

7. Finish the Binding

Fold the binding to the front of the quilt so that it just passes the stitching. To work out how far over the stitching to put the edge, pop a pin in where you are going to stitch close to the edge and it should show just next to the binding on the back.

At the corner, fold right through

DSC05943

and then fold the next side up forming a mitre – You will find it easier to handstitch a little stitch in the corner to hold it for you rather than pinning

DSC05944


Stitching close to the edge, work your way around the quilt.  When you reach a corner, leave your needle down, lift your presser foot and turn the quilt.  Lower your presser foot and continue.

Repeat until binding is complete.

Nanny note:  Don’t worry if your stitching isn’t perfectly positioned on the back – this is something that improves with practice and like I have said before, just step away a bit and it will not even be noticeable!!

Congratulations!!  That is your quilt finished! What an achievement!!  It shows that you just need to Dream to Achieve!

Don’t forget to give your new quilt a name – I’m calling mine ‘Butterfly Dreams’ !  I will include this on my label when I find its new home!

DSC05950


DSC05948


DSC05949


Thank you for joining me in this Quiltalong.  I hope you have enjoyed making your quilt and that you will share a photo . I would also like to thank our sponsors Alan’s Pen Making and A1 Craft and Quilting for providing the gift packs along the way!

What to next?

Until next time

Nanny xx

Please share:

  • Share on Facebook (Opens in new window) Facebook
  • Email a link to a friend (Opens in new window) Email
  • Share on X (Opens in new window) X
  • Share on Pinterest (Opens in new window) Pinterest

Filed Under: NANNY CHAT, QUILTING TUTORIALS, TUTORIALS Tagged With: Dream to Achieve, nannycraft4u, Quilt Along, Tutorials

Make Angel Wings

September 11, 2015 by Nanny 5 Comments

Just recently, while ‘minding’ my grandchildren, the dreaded ‘Book Week’ parade came up and one of the girls wanted to be ‘Lily – The Littlest Angel’  (Elizabeth Pulford) so I had to make some Angel Wings.  I posted about it on instagram and I had a few requests for a tutorial, so here we go!  Let’s make Angel Wings!

I thought I would use some paper plates and some feathers …

11925714_867625956652531_1045055407_n(1)

BUT …….

have you ever tried feathers?  They quickly spread small particles into the air and this Nanny said “NO WAY!”

So now  we were left with just paper plates! (and yes, it was the night before!!!)

So I cut one in half to make the top of the wings

DSC05907


and used a single plate to be the foundation

DSC05909


I then cut some plates like this

DSC05908

and arranged them on each side

DSC05910

When I was happy with the look, I stapled each to the foundation plate (note how I had the plates facing right side out) I stapled from the under side so that the smooth part of the staple would be on her back.

I used packaging tape to secure a length of elastic across the foundation plate at about the level of the 3rd plate down and pushed the ends through a slit made with a sharp knife on the foundation plate.  (I apologise that I dont have a photo of this step)

I then glued a full plate over the top so no sharp staple ends were visible or able to cause damage to small fingers and no elastic was visible.

DSC05917

I then tied the elastic ends together and my little angel slipped each arm through the elastic so that the elastic went across her back and around each shoulder .

I then simply threaded her belt through both ‘armholes’ of elastic and tied it at the front of her costume.  This meant the wings could be easily removed at school if necessary for toileting or play.

IMG_0079


11849965_1614958198765457_2021885371_n


A simple halo of gold tinsel and we were done!

Make Angel Wings


Perfect!!!

Book Week costumes?  Not a problem –  Just ask Nanny!!

Did you get caught up making costumes too?  How did you go?

Until next time

Nanny xx

Please share:

  • Share on Facebook (Opens in new window) Facebook
  • Email a link to a friend (Opens in new window) Email
  • Share on X (Opens in new window) X
  • Share on Pinterest (Opens in new window) Pinterest

Filed Under: NANNY CHAT, TOYS, TUTORIALS Tagged With: Angel Wings, costumes, nannycraft4u, Simple Projects

  • « Previous Page
  • 1
  • …
  • 3
  • 4
  • 5
  • 6
  • 7
  • …
  • 19
  • Next Page »

Welcome!

Welcome! I am Nanny and this is where I like to share my crafting as well as other snippets of our life in Australia. Read more

Social

Follow me on:

Like a Newsletter?

My Button4u

grab button for Nannycraft4u
<div class="nannycraft4u-button" style="width: 150px; margin: 0 auto;"> <a href="http://www.nannycraft4u.com.au" rel="nofollow"> <img src="http://i1168.photobucket.com/albums/r482/Nannycraft4u/logo8-001.jpg" alt="Nannycraft4u" width="150" height="150" /> </a> </div>

Looking for something?

Australian Women Bloggers Directory by Blog Chicks

Subscribe to Blog via Email

Enter your email address to subscribe to this blog and receive notifications of new posts by email.

Follow on Facebook

Follow on Facebook

Favourites

  • Curtain Tie Backs
    Curtain Tie Backs
  • Let's Sew 23 - How to make a simple Library Tote
    Let's Sew 23 - How to make a simple Library Tote
  • Make a lined,ruffle top, drawstring bag.
    Make a lined,ruffle top, drawstring bag.
  • Make a 9 patch block for Fire victims
    Make a 9 patch block for Fire victims
[instagram-feed]

Meta

  • Log in
  • Entries feed
  • Comments feed
  • WordPress.org

© Nannycraft4u

All content and images belong to Nannycraft4u unless otherwise indicated. You are welcome to link back to my blog, but you may not copy whole posts, tutorials or photos without my permission. Please give credit for my work and link back to the original post at Nannycraft4u.com If you use one of my ideas, I would love to know about it. Designs and tutorials are for personal use only.

Copyright © 2026 · Lifestyle Pro Theme on Genesis Framework · WordPress · Log in