• HOME
  • ABOUT
  • BLOG
  • CONTACT
  • FEATURES
  • PARTIES I LINK TO

Nannycraft4u

Make your handmade dreams a reality - Just ask Nanny!

  • CHARITY PROJECTS
  • TUTORIALS
    • BAGS,POUCHES,ROLLS,WALLETS
    • EMBROIDERY
    • HOME/DECOR
    • LET’S SEW
    • QUILTING TUTORIALS
    • SPIN THE PINS
    • TOYS
    • WOTZA WEDNESDAY
  • SEWING/QUILTING
    • SIMPLE PROJECTS
    • TIPS & TOOLS
  • RECIPES
  • NANNY CHAT
  • NANNY & POPPY PROJECTS
    • CRAFT ROOM
    • HOUSE
    • TRAVEL
Home » NANNY CHAT » Page 2

Make a Railfence Variation Quilt Block

February 13, 2017 by Nanny 4 Comments

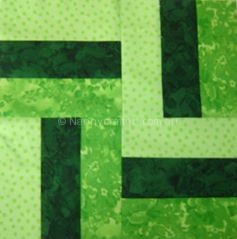
Today we will be making the 2nd block of our sampler  – a Railfence Variation.

Last year we made a Railfence block using three strips and today we  are going to make a Railfence Variation using two strips.


BLOCK 2 – Rail Fence Variation

BLOCK 2 - Railfence Variation

What you need:

Dark:  5×5″ squares

Light:  5×5″ squares

Let’s Sew:

  1.   Take the light squares and fold in half and finger press or draw a line down the centre.
  2.   Place the light square and a dark square, right sides together and sew a scant 1/4″ either side of the centre line. (better too scant than not enough)
  3.   Cut along the line between the two rows of stitching.


4.  You now have a nice pile of rectangles!  Take to the pressing board or ironing board and press toward the dark.


Nanny tip:  If you are not confident with your measuring and cutting try this – I have put a strip of masking tape along the 2.25″ line.  Why 2.25″?  This is half of 4.5″ and we are going to trim our squares to 4.5″


5  Place the 2.25″ side of your rule on the dark side and you will notice how the tape butts up against the seam line.


6.  Trim the squares – made easy with a 4.5″ rule, but the same process for any size rule.

7.  If you are using for example, a 6.5″ rule,  place the rule with the 4.5″ line along the bottom and the tape running along the seam.


8.  Trim the right hand side and along the top


9.  Turn it around, check that you have the 4.5″ mark both ways on the corner (see pen) and the tape running along the seam


10.  Trim the right hand side


11.  Lay out your squares following the photo – you will have 1 square left over.


12.  Complete your 9 patch.


I hope you enjoyed the measuring and trimming – both are really important skills in quilting!

Until next time

Nanny xx


Please share:

  • Share on Facebook (Opens in new window) Facebook
  • Email a link to a friend (Opens in new window) Email
  • Share on X (Opens in new window) X
  • Share on Pinterest (Opens in new window) Pinterest

Filed Under: NANNY CHAT Tagged With: beginner sewing, charm squares, quilt blocks, Quiltalong, railfence variation, Sampler Quilt

Make a 9 patch Sampler with Nanny

February 6, 2017 by Nanny 10 Comments

Welcome to our Sewalong where we will make a 9 Patch Sampler.  This will consist of 16 blocks each measuring 12.5″ and  based on a traditional 9 Patch block.

Instructions will be given for the completion of each block.  At times I will offer you more detail by providing a link, where, if you  click on the word here or the highlighted word, it will take you to the more detailed explanation.

My purpose is :

1. to keep the tutorials short for those already experienced while providing the learners with the more involved detail; and

2.  to save me repeating tutorials that I have already done.   Feedback is welcomed.

Nanny Note:  You will  notice a new addition to my pages at the top of the page – if you click on the ‘Print Friendly’  it will prepare the page for printing minus all of the side bars ie you will just be printing the tutorial.  Please let me know if you have any problems with it.

Fabric requirements:

I will be using up Black and White charm squares from my stash but look forward to seeing your fabric choices.

I have used 3 fabrics:

  1.  A Dark (White on Black background) This is the main fabric
  2.  A Light ( Black on a white background) This is like a background fabric and you might choose to use the same Light throughout
  3.  Other  (plain black) This is a feature or contrast

As I am using my charm squares my fabric calculations will be based on that.

So fabric requirements are:

1st Fabric –  my Dark   – 1.5m

2nd Fabric – my Light  – 1.5m

3rd Fabric  – my Other – 0,5m

These are approximate and you will need more depending on how you decide to finish the quilt top.  Borders, sashing, backing and binding are not included.

You may choose to select a colour combination, purchase a couple of FQs to get started and build on it as you go.  If you decide to do this but with WOF (width of fabric) pieces buy 30cm pieces.

You can cut 12 x 5″ squares from a FQ and  8 across a wof strip so 16  from a 30cm cut.

Charm squares are 5″ square and will be my starting point – I will tell you if you need a different size.  I decided to leave the squares at 5″ to allow a bit of leeway and more practice for you at trimming.

I suggest if you dont already have a quilting ruler, now is a great time to look out for one!  The 6.5″ square is a very handy size and you will use this to cut and  trim squares.

I also suggest that you take the time to check your 1/4″ seam – you can see instructions how to do that here.

BLOCK 1 – 9 Patch

Our first block is going to be a 9 patch as it will be the basis of all our blocks and of course our 9 Patch sampler.  To find more detail, please look  here.


What you need:

Cut 9 x 4.5″ squares – 5 Dark (black background) and 4 Light (white background) (more details on how to cut squares can be found here )

If you are cutting your own squares cut them at 4.5″ OR if you are using charm squares trim them to 4.5″


Nanny Note:  This is a good block to use ‘directional’ fabrics if you have them.  I had these Eiffel towers and thought the birds went well with them.

Let’s Sew:

  1. Cut or trim your squares
  2. Organise your squares and prepare for sewing.


2.  Fold the left side squares over onto the centre squares and stitch together.  Chain piecing saves cotton and keeps squares in order, see here.

3.  Now flip the squares on the right over on to the centre squares and sew together.


4.  You now have 3 rows to take to the pressing board  or ironing board remember to press up and down – dont iron!


5.  Press toward the dark so your rows will appear like this.


Notice how with the seams being pressed this way, it makes it easier to ‘nest’ the seams when joining the rows.  Nesting means that they  lock in place when you hold them together.  You can see more about nesting your seams here.

6.  Sew the rows together checking that you have them in the correct order.  If you nest the seams you will find that you will not need to use pins – keep your finger on the nest as you feed it through the machine.  You will end up with nicely joined corners. Please use pins if you prefer but I encourage you to try this method.


7.  Press and admire your block!  It will measure 12.5″ – if it doesn’t, please check your cutting and 1/4″ seams a s per directions above.


Well that wasn’t painful at all was it – your 9 Patch Sampler is underway!!

Don’t forget to show us your block and ask if you need help.

We will look at Block 2 next week.

Until next time

Nanny xx

WEEK 2:  Make a Railfence Variation

WEEK 3: Make Half Square Triangles

WEEK 4: Make a Shoo Fly Block

WEEK 5: Make a Friendship Star

WEEK 6: Make a Contrary Wife Block

WEEK 7: Make a Spool Block

WEEK 8: Make a Churn Dash Block

WEEK 9: Make a Formal Garden Block

WEEK 10: Make a Greek Cross Block

WEEK 11: Make a Chevron Block

WEEK 12:  Make a Birds in the Air Block

WEEK 13:  Make a Double 9 Patch Block

WEEK 14:  Make a Card Trick Block

WEEK 15: Make an Ohio Star Block

WEEK 16: Make Your own Block

WEEK 17: Complete the top

WEEK 18:  Backing with a Disappearing 9 patch

WEEK 19:  Completion of the 9 patch sampler

Please share:

  • Share on Facebook (Opens in new window) Facebook
  • Email a link to a friend (Opens in new window) Email
  • Share on X (Opens in new window) X
  • Share on Pinterest (Opens in new window) Pinterest

Filed Under: NANNY CHAT, QUILTING TUTORIALS, TUTORIALS Tagged With: 9 patch, quilt blocks, quilting tutorial, Sampler Quilt

New Year Planning

January 26, 2017 by Nanny Leave a Comment

Hi!  We are going to start off the new year  planning to  make a  9 Patch Sampler.

Last year, as a part of the activity on my Nanny Sews and Crafts page on Facebook, we decided to have a beginners quilt block swap.

We made the same block each month and the ‘Queen’ for the month decided on colour placement and layout.

This resulted in some interesting results and lots of practice of those pesky 1/4″ seams!


So. to build on these newly acquired skills, rather than a swap this year, we are undertaking to make a  9 Patch Sampler quilt.

We would love it if you would join us!

Starting in February, I will post each block here on the blog and each tutorial will remain as a resource.

I hope you will join us as you make a 9 Patch Sampler of your own.

I can’t wait to see everyone’s fabric choices!

Until next time

Nanny xx

Please share:

  • Share on Facebook (Opens in new window) Facebook
  • Email a link to a friend (Opens in new window) Email
  • Share on X (Opens in new window) X
  • Share on Pinterest (Opens in new window) Pinterest

Filed Under: NANNY CHAT, SEWING/QUILTING Tagged With: 9 patch, Quiltalong, quilting, Sampler Quilt

Hexie Travel Kit Add On

December 13, 2015 by Nanny Leave a Comment

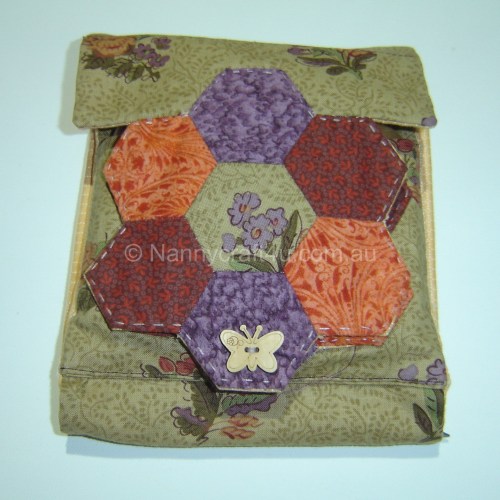
Some time ago I spotted a gorgeous travel kit for hexies in a wonderful series of tutorials on English Paper Piecing by Haley from The Zen of Making and quickly ‘pinned’ it to make ‘one day’. (I wanted to share my Hexie Travel Kit Add On so I contacted Hayley and she graciously permitted me to use her photos – thanks Haley!)

english_paper_piecing_part_3_final_02 english_paper_piecing_part_3_final_04


Imagine my surprise when soon after, I received a gift from an online friend that was exactly that kit!  I couldn’t believe it and felt so special!

Hexie Kit Add On

As some of you are aware, my Dad is in an Aged Care Facility and I visit with him most days.  I take my kit with me, and if Dad is having a ‘quiet’ day , I will sit with him and sew.

It was during this time, concerned about roaming hands and the welfare of residents (some of them move very quickly when you are not looking), I decided to plan some additions to the kit to make it better suit my needs and make my sewing experience ‘safer’ for all.

My friend had included some of the fabric in the kit so I used it to make a needle keep.  Of course it had to be a hexie with a hexie flower added!!  This fits perfectly on the back of the hexie flower flap and was easily hand stitched to the backing fabric.

Hexie Kit Add On 2Hexie Kit Add On 3


On the next section of the flap, I stitched a piece of cord to the flap using a button and added 2 jewellery 10mm Jump Rings – my thread is now secure but easy to change if I need another colour.

Hexie Kit Add On4


Then on the next section, I wanted to have a spot for some scissors or snips.  An easy solution was to stitch two ponytail elastics to the flap.  If you were doing this as part of the total construction, you could make a fabric scissor keep for here.

Hexie Kit Add On 5


The changes I made were quick and easy and I now have a fully functional travel kit with a secure place for everything I need.

Hexie Kit Add On 6


and it hasn’t changed the exterior of the original!

Hexie Kit Add On

I love my Kit and if you like to carry stitching with you – on the train, waiting for children etc etc then I would say get over to The Zen of Making and do yourself a favour  – make yourself a Travel Kit – you will not regret it and  you might even like to try my Hexie Travel Kit Add On!

Until next time

Nanny xx


Please share:

  • Share on Facebook (Opens in new window) Facebook
  • Email a link to a friend (Opens in new window) Email
  • Share on X (Opens in new window) X
  • Share on Pinterest (Opens in new window) Pinterest

Filed Under: NANNY CHAT, SIMPLE PROJECTS Tagged With: Hand stitching, Hexie, Hexie Travel kit, Travel Kit

Gluten Free Microwave Christmas pudding

December 11, 2015 by Nanny 4 Comments

Many years ago now, I attended a series of workshops on cooking with the microwave where we were given recipes from The Sharp Test Kitchen and this is one of them and over the years I have altered it to become my Gluten Free Microwave Christmas Pudding.  This makes a large pudding and I have tried it both this way and as a smaller one so I will give you both versions.

The Tupperware ‘Crisp It’ container is perfect for making this pudding!

Gluten Free Micriowave Christmas Pudding 12


I use this container for the smaller one:

Microwave Christmas Pudding 1


What you need:

Large (Small)

250g butter (125g)

250g brown sugar (125g)

4 eggs  (2 eggs)

1kg mixed fruit  (0.5kg dried fruit)

1 cup pie apple  (1/2 cup pie apple)

1 cup plain Gluten Free flour  (1/2 cup plain GF flour)

1.5 cups Gluten Free breadcrumbs  (3/4 cup GF breadcrumbs)

1 teaspoon cinnamon (1/2 teaspoon cinnamon)

1/2 teaspoon nutmeg  (1/4 teaspoon nutmeg)

1/2 teaspoon ginger  (1/4 teaspoon ginger)

1/2 teaspoon allspice  (1/4 teaspoon allspice)

1 Tablespoon Golden Syrup  (2 teaspoons Golden Syrup)

2 Tablespoons Parisienne Essence  (1 Tablespoon Parisienne Essence)

!/2 cup Sweet Sherry  (1/4 cup Sweet Sherry)

What you do:

  1.  Cream butter and sugar

Gluten Free Microwave Christmas Pudding1


Add eggs and beat

Gluten Free Microwave Christmas Pudding4


Gradually add fruit alternatively with flour, breadcrumbs and spices

Gluten Free Micriowave Christmas Pudding 9


Fold in Golden Syrup, Parisienne Essence and Sherry

Gluten Free Microwave Christmas pudding 5 Gluten Free Microwave Christmas Pudding 6 Gluten Free Microwave Christmas Pudding 7


Grease and flour a large pudding shaped heatproof container – 2litres (1.25l)

Pack the mixture into the container and microwave on MEDIUM LOW/DEFROST for 38mins  (Small version cook on LOW( 30%) for about 35 minutes or until cooked

Gluten Free Micriowave Christmas Pudding 11


Cover the outside edges of pudding with foil about 1″ wide and continue cooking on MEDIUM LOW/DEFROST for another 15-20 minutes or until cooked (this step not needed for smaller version)

Gluten Free Micriowave Christmas Pudding 13


Stand for 10-15 minutes before turning out

Gluten Free Micriowave Christmas Pudding 15


Now isn’t that the easiest Gluten Free Microwave Christmas Pudding that you have ever seen!!!!  I’ll cut it open:

Gluten Free Micriowave Christmas Pudding 20


Perfect – A lovely moist Gluten Free Microwave Christmas pudding!

Enjoy!

Until next time

Nanny xx

Nanny Edit:  This was the first time making this in my new microwave and I had to keep playing with the time and power level so just keep an eye on it.  It will be a little undercooked in the middle when it is done and this will continue to cook as it cools.

Nanny Edit 2:  It is delicious!!  What else were we to do – I had to cut a slice to show you!!!

Please share:

  • Share on Facebook (Opens in new window) Facebook
  • Email a link to a friend (Opens in new window) Email
  • Share on X (Opens in new window) X
  • Share on Pinterest (Opens in new window) Pinterest

Filed Under: NANNY CHAT, RECIPES Tagged With: Gluten Free, Simple recipes, Xmas Pudding

  • « Previous Page
  • 1
  • 2
  • 3
  • 4
  • …
  • 19
  • Next Page »

Welcome!

Welcome! I am Nanny and this is where I like to share my crafting as well as other snippets of our life in Australia. Read more

Social

Follow me on:

Like a Newsletter?

My Button4u

grab button for Nannycraft4u
<div class="nannycraft4u-button" style="width: 150px; margin: 0 auto;"> <a href="http://www.nannycraft4u.com.au" rel="nofollow"> <img src="http://i1168.photobucket.com/albums/r482/Nannycraft4u/logo8-001.jpg" alt="Nannycraft4u" width="150" height="150" /> </a> </div>

Looking for something?

Australian Women Bloggers Directory by Blog Chicks

Subscribe to Blog via Email

Enter your email address to subscribe to this blog and receive notifications of new posts by email.

Follow on Facebook

Follow on Facebook

Favourites

  • Let's Sew 23 - How to make a simple Library Tote
    Let's Sew 23 - How to make a simple Library Tote
  • Curtain Tie Backs
    Curtain Tie Backs
  • Make a lined,ruffle top, drawstring bag.
    Make a lined,ruffle top, drawstring bag.
[instagram-feed]

Meta

  • Log in
  • Entries feed
  • Comments feed
  • WordPress.org

© Nannycraft4u

All content and images belong to Nannycraft4u unless otherwise indicated. You are welcome to link back to my blog, but you may not copy whole posts, tutorials or photos without my permission. Please give credit for my work and link back to the original post at Nannycraft4u.com If you use one of my ideas, I would love to know about it. Designs and tutorials are for personal use only.

Copyright © 2026 · Lifestyle Pro Theme on Genesis Framework · WordPress · Log in