• HOME
  • ABOUT
  • BLOG
  • CONTACT
  • FEATURES
  • PARTIES I LINK TO

Nannycraft4u

Make your handmade dreams a reality - Just ask Nanny!

  • CHARITY PROJECTS
  • TUTORIALS
    • BAGS,POUCHES,ROLLS,WALLETS
    • EMBROIDERY
    • HOME/DECOR
    • LET’S SEW
    • QUILTING TUTORIALS
    • SPIN THE PINS
    • TOYS
    • WOTZA WEDNESDAY
  • SEWING/QUILTING
    • SIMPLE PROJECTS
    • TIPS & TOOLS
  • RECIPES
  • NANNY CHAT
  • NANNY & POPPY PROJECTS
    • CRAFT ROOM
    • HOUSE
    • TRAVEL
Home » SEWING/QUILTING » TIPS/TOOLS » Page 5

How to finish Softies – Ladder Stitch

February 20, 2013 by Nanny 12 Comments

After you have ‘stuffed’ your softies , pin cushions, cushions etc you need to ‘close’  the gap in the seam by hand.   A good way to do this is with Ladder Stitch – think a ladder and lots of rungs!
Take a needle and a knotted thread and slide the needle through the seam allowance at the beginning of the opening.
Slide the needle along inside the seam allowance on one side to form a stitch
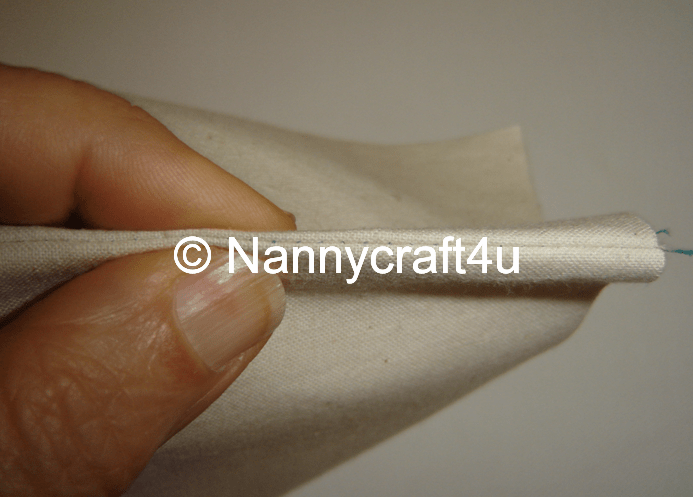
Then insert the needle in the other side, directly opposite the point the needle came out, and take another stitch.  Repeat this for 4-5 stitches – see on my finger
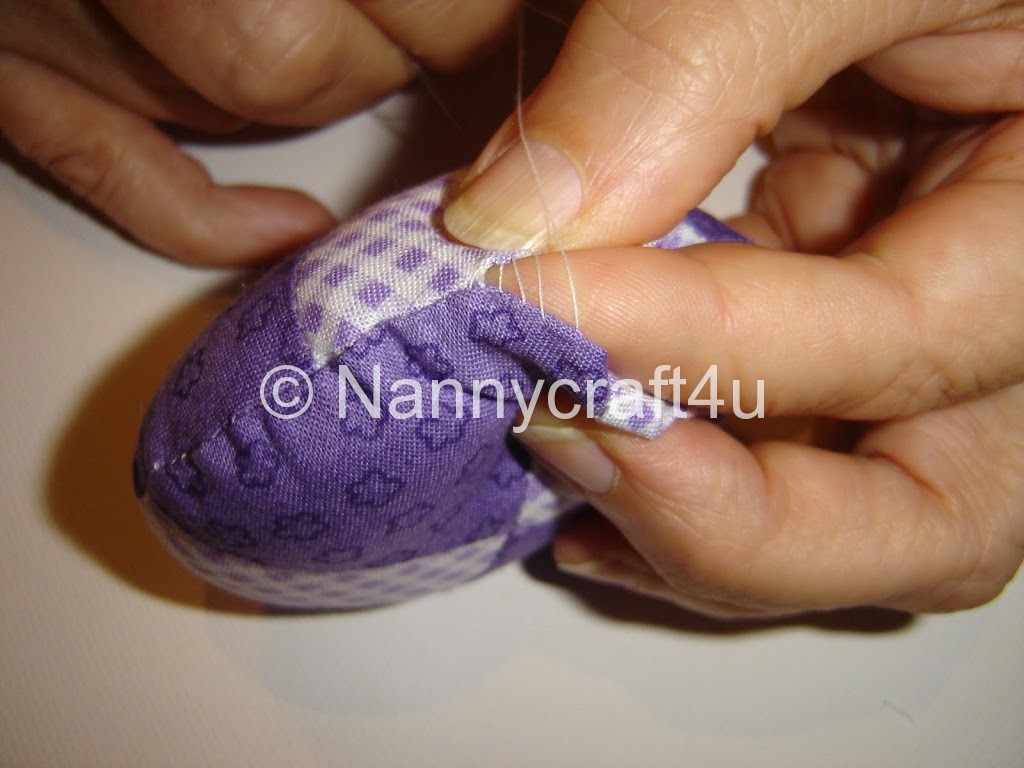
Then pull the thread to close the stitches.  Continue with this till the seam is closed. Finish with a double stitch and push your needle out through the finished item – trim.
You will have a lovely, neat finish  !
Until next time
Nanny xx

Please share:

  • Share on Facebook (Opens in new window) Facebook
  • Email a link to a friend (Opens in new window) Email
  • Share on X (Opens in new window) X
  • Share on Pinterest (Opens in new window) Pinterest

Filed Under: SEWING/QUILTING, TIPS/TOOLS, TUTORIALS

Let’s Sew – Part 9 – Sewing around Curves

October 14, 2012 by Nanny 3 Comments

Good Morning!
Now that we have you sewing straight seams it is time to take a look at curved seams.  You will want to use these on necklines, armholes etc  
You basically have two types of curved seams – concave and convex – or ones that curve inwards and ones that curve outwards!!  Some people like to refer to them as valleys and hills – it doesn’t really matter what you call them and once you know how to go about sewing them it doesn’t make any difference!!

The first thing to remember is that they are curves – they are not straight and all the pulling and tugging in the world won’t make them so.  You can see what happens in the photo below – it just makes you get a lot of folds and makes it most difficult to sew without ending up with puckers and pleats.

So when sewing a curve you have to follow the curve!
I am going to use my 1/4″ foot ..  As I sew, following the curve, I will make adjustments just like we did when we were sewing a corner – I will leave the needle down, lift the Pressure foot and adjust the fabric.  I will then proceed carefully, repeating the adjustment when ever it is required.  It really is that simple!!

Now we have our curved seams all stitched up we need to turn the seam

Oh dear!  Not very attractive is it!!  Don’t worry – this is easily fixed as well.
When your curve is inwards – snip                      When your curve is outwards – cut out a v

Some people love using Pinking Shears on their curves.  Pinking Shears are special scissors that have a serrated cutting edge and make cutting the v’s so easy!!
After you have snipped and v’ed, roll the seam between your thumbs and fingers.

Now sometimes you will notice a pattern asking you to ‘under stitch’ your curved seam. This is done to keep the facing and main piece from rolling open and helps it to sit flat and, unlike top-stitching, it is not visible on the outside of the project.
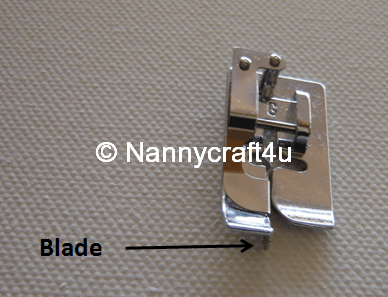
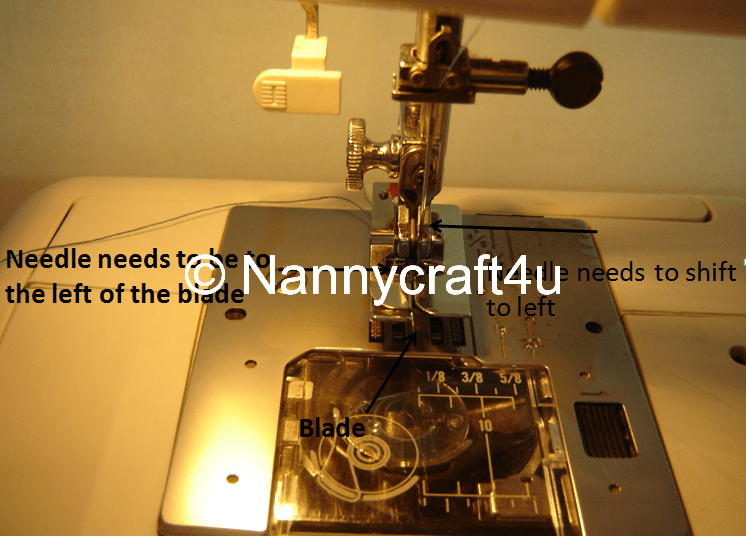
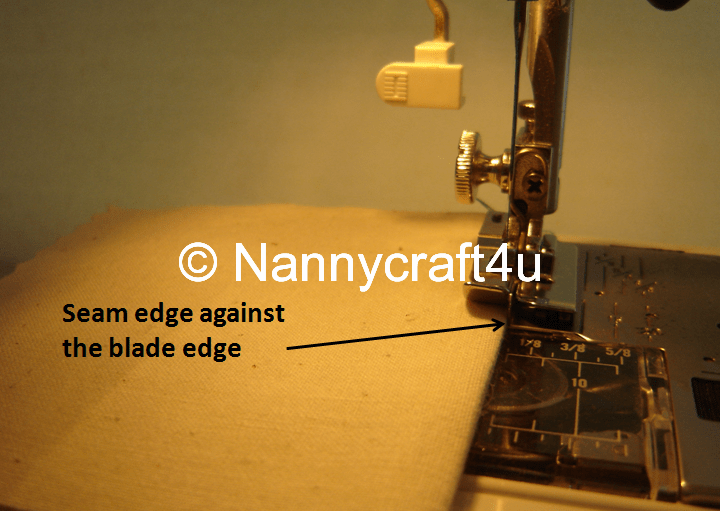
To do this, press the seam towards the facing (I have marked it with an F) and sew through the main fabric and the seam allowance, on the right side.  I am using my Stitch in the Ditch Foot and you can see the blade is running along the edge of the seam and the needle is moved as far as it will go to the left. This will ensure that it sews on the facing. Sew carefully along the seam, pulling the seam open as you go.
This photo shows the underside with the stitching on the facing side of the seam:

and this is our two curved seams stitched and understitched!
Neat isn’t it!!

Now that we have curves sorted how about another sewing room Project??

Until next time
Nanny xx

Please share:

  • Share on Facebook (Opens in new window) Facebook
  • Email a link to a friend (Opens in new window) Email
  • Share on X (Opens in new window) X
  • Share on Pinterest (Opens in new window) Pinterest

Filed Under: LET'S SEW, SEWING/QUILTING, TIPS/TOOLS, TUTORIALS

Let’s Sew Part 6 – Top stitching

October 9, 2012 by Nanny Leave a Comment

Good morning!  
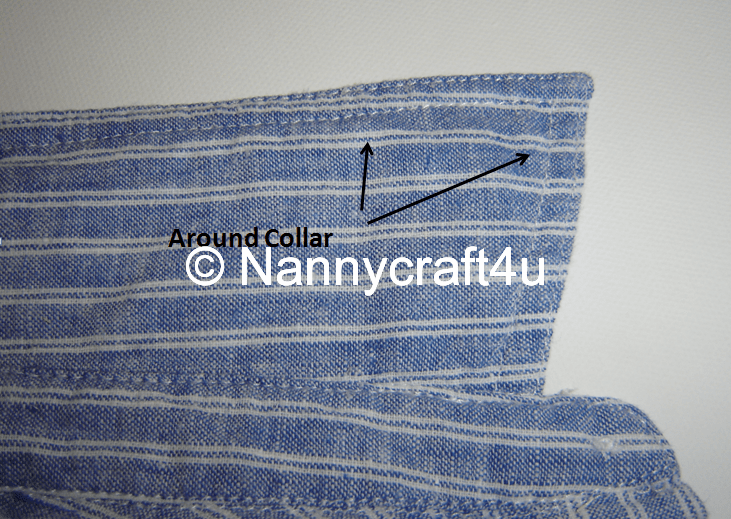
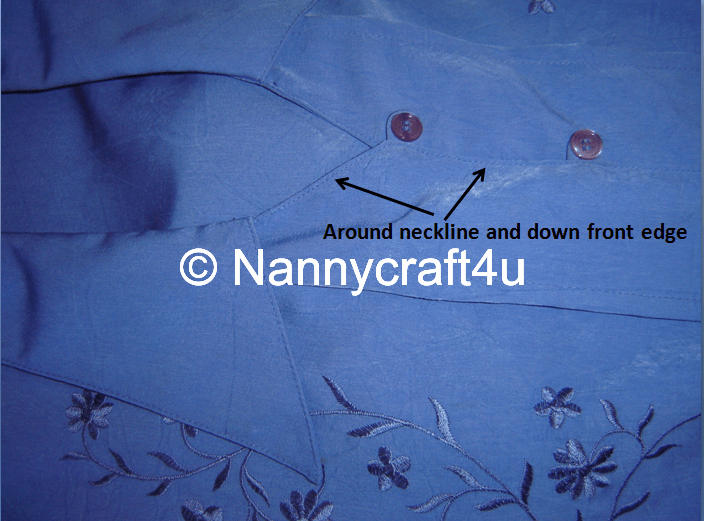
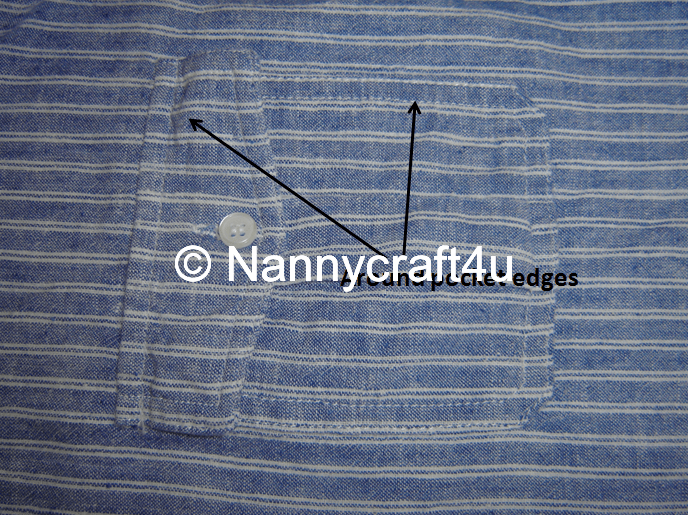
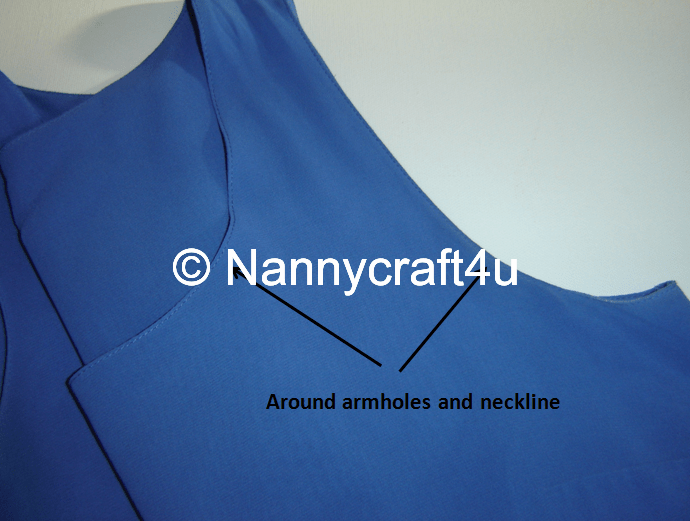
Often when we are sewing, we need to do some top-stitching.  I gathered some examples  (these are all store made):


These are the main areas that you would see topstitching used in clothing, but it is also used extensively in bags, journal covers, soft books etc.

You can use the All Purpose Pressure Foot (reminder here) or you might like to try the ‘Stitch in the Ditch’ Foot.

The ‘Stitch in the Ditch’ foot has a little blade that makes it very easy for it to glide along the edge and hence keep your top stitching at an even distance from that edge.
Let’s sew two pieces together to make a seam and then we will top stitch it.

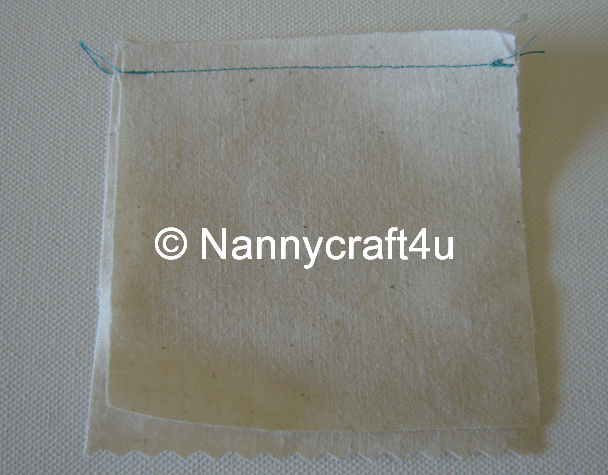
Stitch the seam, press to set the seam and then roll the seam between the finger and thumb. Press.
Attach the Stitch in the Ditch Foot

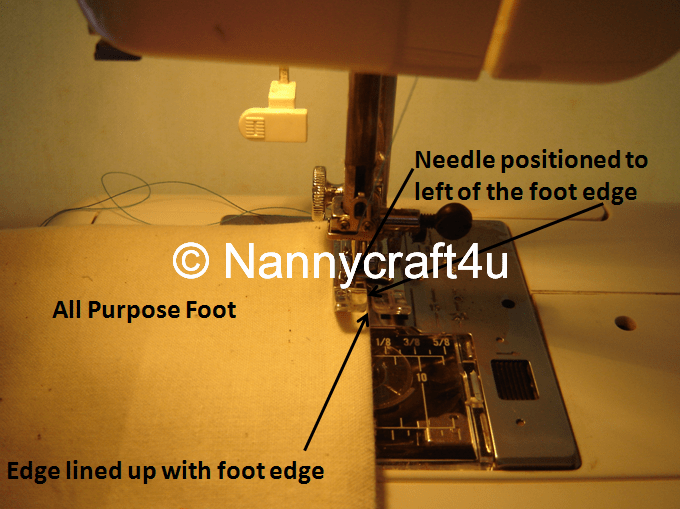
or attach the all Purpose Pressure Foot

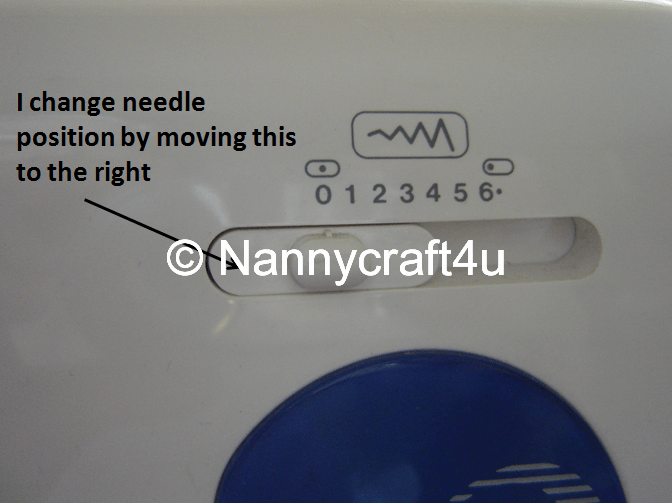
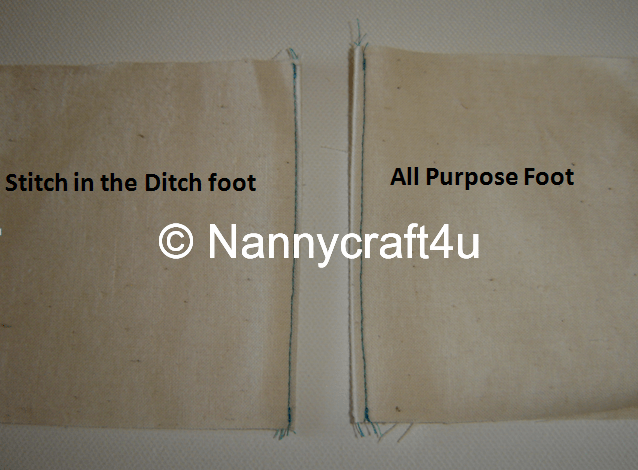
Either way works just as well (I made them different widths so you would know I did two samples!!)  You just have to remember to shift the needle to achieve the distance from the edge that you want.
Well done – that covers the techniques that are needed for the first Sewing Room Project!
Until next time
Nanny 🙂

Please share:

  • Share on Facebook (Opens in new window) Facebook
  • Email a link to a friend (Opens in new window) Email
  • Share on X (Opens in new window) X
  • Share on Pinterest (Opens in new window) Pinterest

Filed Under: LET'S SEW, SEWING/QUILTING, TIPS/TOOLS, TUTORIALS

Lets Sew Part 5 – Straight Stitching

October 9, 2012 by Nanny Leave a Comment


Good Morning!!
We have now filled our bobbin, threaded the machine, attached the foot for the job and changed the needle – I guess we can’t delay this any longer!!
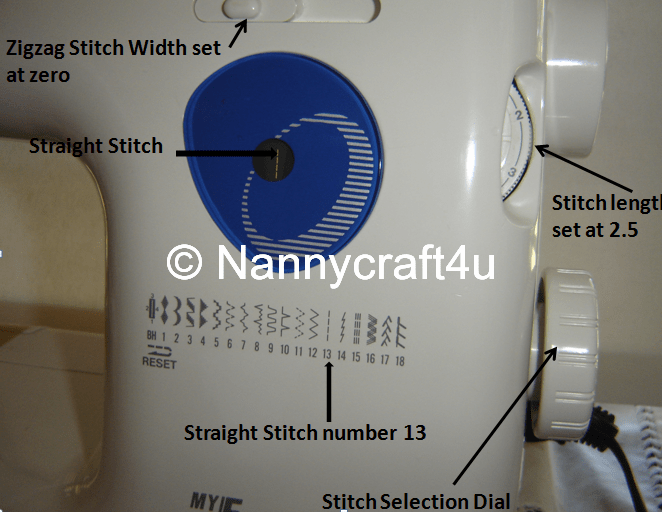
We are going to use straight stitching.  Betsy has a nice little window where I can see that I have her set to straight stitch – I change the stitch selection by turning the dial on the side.

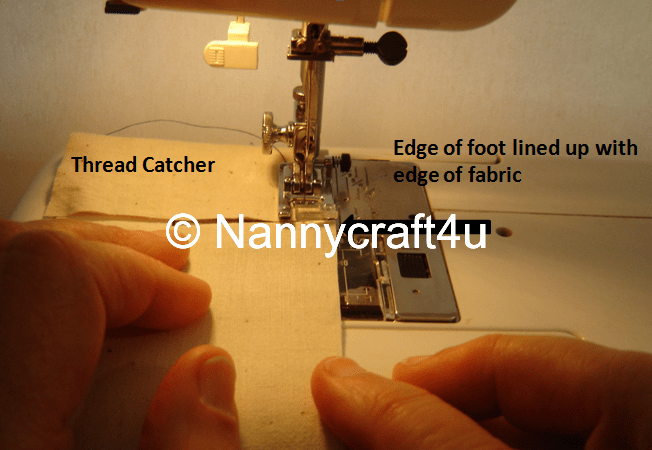
NANNY TIP:  Get a small scrap of fabric to act as a thread catcher – start sewing on the thread catcher and snip off when done and use over and over!!

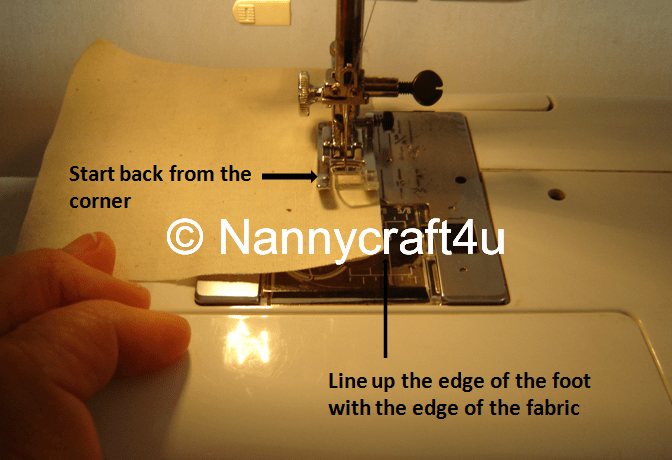
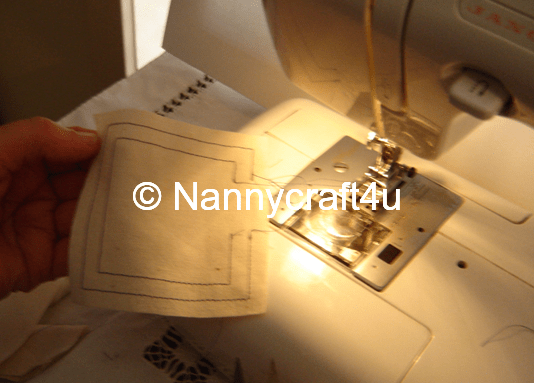
Take a strip of fabric, line up the edge of the foot with the edge of the fabric and lower the foot. Watching the edge of the foot, start sewing on the thread catcher and when you move onto the fabric, sew about 3 stitches.  Holding the reverse button, stitch a couple of stitches and then release and sew the line, finishing with a couple of reverse stitches at the end.

NANNY TIP:  DO NOT WATCH THE NEEDLE – WATCH THE EDGE OF YOUR FOOT!!

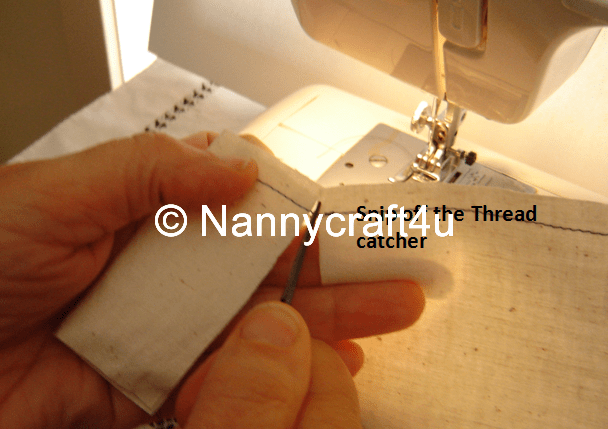
Snip the thread catcher off and it is ready to go again!

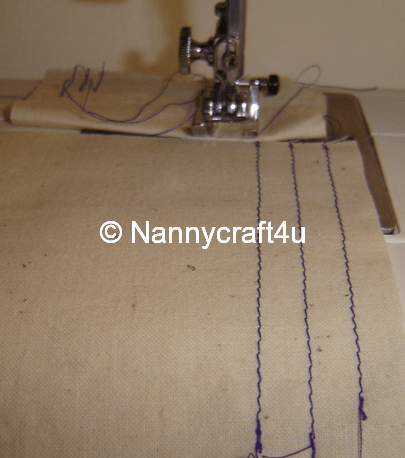
Line the edge of your foot up with the stitch line you just made and go again, remembering to start and finish with a couple of reverse stitches.  Keep practicing and you will soon be confident in sewing a straight line!!

Sometimes we need to sew ‘around corners’, so let’s go!

NANNY TIP:  Don’t start at the corner!


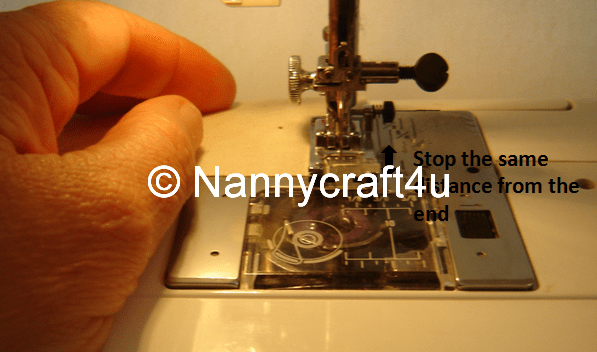
Start about 1″-2″ before a corner.  Lower the Pressure foot lining up the edge of the foot with the edge of the fabric and sew till about the same distance from the other side (you may need to slow down a bit – no speed hogs allowed!!)

Use your hand wheel to do the last couple of stitches, ending up with the needle still in the fabric.

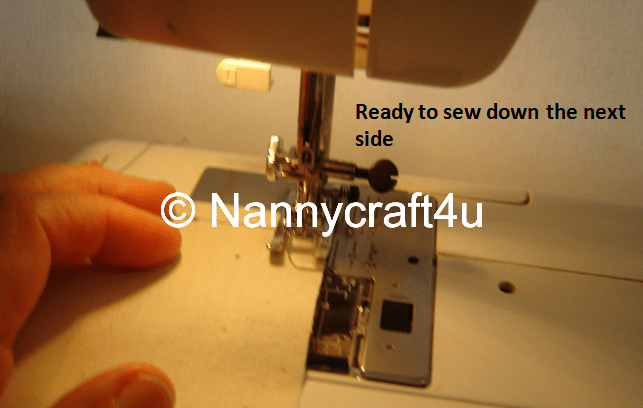
Lift the Pressure Foot, turn the fabric and lower the Pressure foot so that it is now ready to sew down the other side.

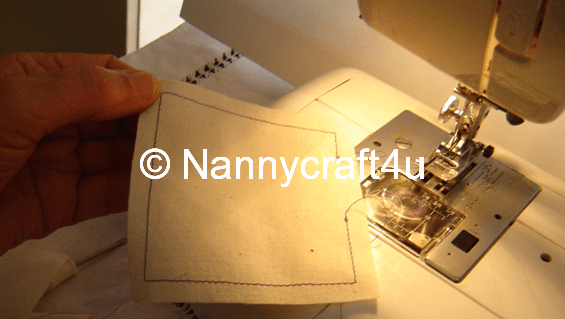
Keep going until you have completed all corners.

Start again and practice some more!
 

Well done!!

Until next time
Nanny  🙂


Please share:

  • Share on Facebook (Opens in new window) Facebook
  • Email a link to a friend (Opens in new window) Email
  • Share on X (Opens in new window) X
  • Share on Pinterest (Opens in new window) Pinterest

Filed Under: LET'S SEW, SEWING/QUILTING, TIPS/TOOLS, TUTORIALS

Lets Sew – Part 4 – Changing the needle

October 9, 2012 by Nanny Leave a Comment

Good Morning!

Today we need to look at which needle to use.  A general rule is fine threads and needles for fine fabrics, heavier threads and needles for heavier fabrics.
If you have your fat 1/4s, you will have quilting cotton and so we need to use a medium weight needle – size 11(75) – 14(90).  Just like any tools, it is important to have sharp needles – many people don’t change the needle unless it breaks !!!, but it is a good habit to change the needle at least every 8-10 sewing hours or when you start a new project.  A blunt needle can create more problems than it is worth, so start out keeping your machine in ‘top’ condition and ‘she’ will reward you with more trouble free hours of enjoyment!
Changing the needle is a simple operation so let’s do it!

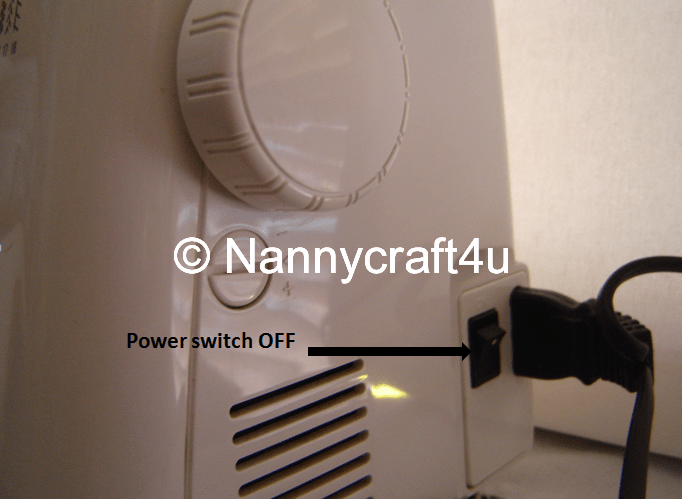
The first thing to do is Turn Off The Power!

Raise the needle to its highest point by turning the Balance Wheel.
Lower the Pressure Foot
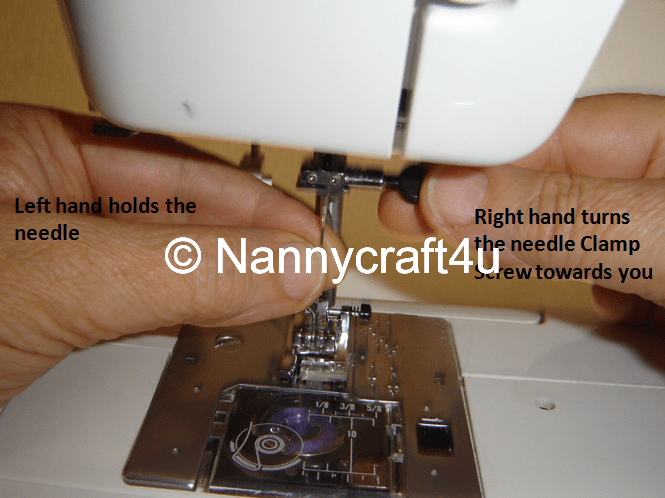
Holding the needle in your left hand, turn the needle Clamp Screw toward you until the needle comes free – don’t get carried away or you will screw it right off!!

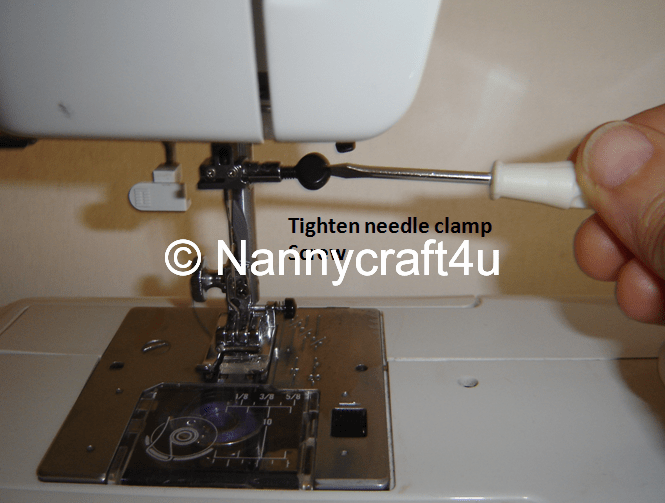
Take your new needle and insert into the clamp with the flat side away from you (check your manual if different) and push it in as far as it will go. Tighten the Needle Clamp Screw with your fingers and then more firmly. (you will have a small screwdriver in your machine kit)

There you go – I said it was easy!!! 
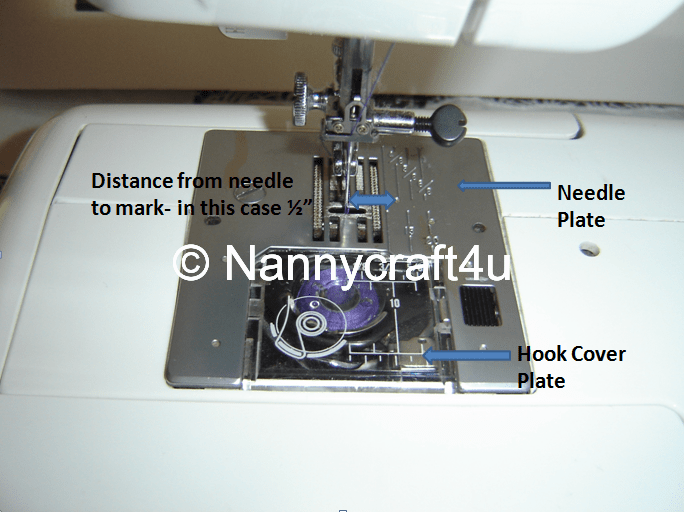
Now before we get sewing I want to check the size of seams.  In the photo below, I have removed the foot and wound the needle down.  The measurements you see on the Needle Plate and the Hook Cover Plate are the distance from the needle to that mark.

These are here to act as a fabric guide ie the edge of your fabric will move along that line and ensure you have straight, even seams!

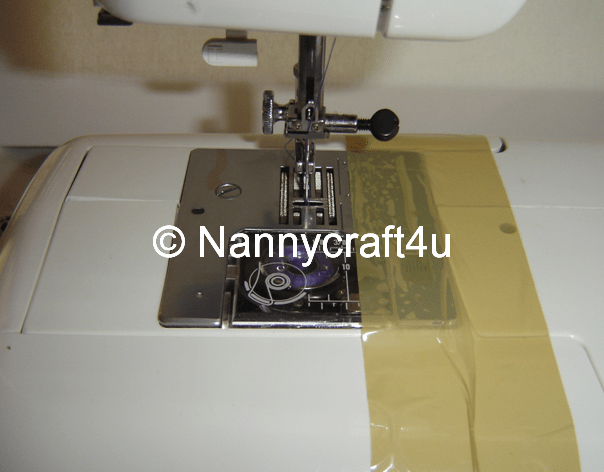
Many of the patterns you download have 1/2″ seam allowances and quilters use 1/4″ seams.  I have put a piece of tape along the 1/2″ line to show you an easy way to get used to these measurements.

Warning:  Don’t use packaging tape like this – it lifted the silver from the plate (Oh NOOO!!!!)
Now you just have to thread your new needle and we can sew!
Until next time
Nanny  🙂

Please share:

  • Share on Facebook (Opens in new window) Facebook
  • Email a link to a friend (Opens in new window) Email
  • Share on X (Opens in new window) X
  • Share on Pinterest (Opens in new window) Pinterest

Filed Under: LET'S SEW, SEWING/QUILTING, TIPS/TOOLS, TUTORIALS

  • « Previous Page
  • 1
  • …
  • 3
  • 4
  • 5
  • 6
  • Next Page »

Welcome!

Welcome! I am Nanny and this is where I like to share my crafting as well as other snippets of our life in Australia. Read more

Social

Follow me on:

Like a Newsletter?

My Button4u

grab button for Nannycraft4u
<div class="nannycraft4u-button" style="width: 150px; margin: 0 auto;"> <a href="http://www.nannycraft4u.com.au" rel="nofollow"> <img src="http://i1168.photobucket.com/albums/r482/Nannycraft4u/logo8-001.jpg" alt="Nannycraft4u" width="150" height="150" /> </a> </div>

Looking for something?

Australian Women Bloggers Directory by Blog Chicks

Subscribe to Blog via Email

Enter your email address to subscribe to this blog and receive notifications of new posts by email.

Follow on Facebook

Follow on Facebook

Favourites

  • Curtain Tie Backs
    Curtain Tie Backs
  • Let's Sew 23 - How to make a simple Library Tote
    Let's Sew 23 - How to make a simple Library Tote
  • Make a lined,ruffle top, drawstring bag.
    Make a lined,ruffle top, drawstring bag.
  • Make a 9 patch block for Fire victims
    Make a 9 patch block for Fire victims
[instagram-feed]

Meta

  • Log in
  • Entries feed
  • Comments feed
  • WordPress.org

© Nannycraft4u

All content and images belong to Nannycraft4u unless otherwise indicated. You are welcome to link back to my blog, but you may not copy whole posts, tutorials or photos without my permission. Please give credit for my work and link back to the original post at Nannycraft4u.com If you use one of my ideas, I would love to know about it. Designs and tutorials are for personal use only.

Copyright © 2026 · Lifestyle Pro Theme on Genesis Framework · WordPress · Log in