• HOME
  • ABOUT
  • BLOG
  • CONTACT
  • FEATURES
  • PARTIES I LINK TO

Nannycraft4u

Make your handmade dreams a reality - Just ask Nanny!

  • CHARITY PROJECTS
  • TUTORIALS
    • BAGS,POUCHES,ROLLS,WALLETS
    • EMBROIDERY
    • HOME/DECOR
    • LET’S SEW
    • QUILTING TUTORIALS
    • SPIN THE PINS
    • TOYS
    • WOTZA WEDNESDAY
  • SEWING/QUILTING
    • SIMPLE PROJECTS
    • TIPS & TOOLS
  • RECIPES
  • NANNY CHAT
  • NANNY & POPPY PROJECTS
    • CRAFT ROOM
    • HOUSE
    • TRAVEL
Home » SEWING/QUILTING » Page 3

Make a Design Board

October 11, 2015 by Nanny 11 Comments

GnomeAngel.com

Hi!

This is something I am going to be using constantly while making my Farmer’s Wife 1930’s quilt so I thought I would show you how easy it is to make a Design Board.

What you need:

An art canvas – pick one up for a couple of dollars.  Mine is 12″ x 12″

A scrap of cotton wadding

A staple gun

DSC06004

Let’s do it!

  1.  Place the wadding on a hard surface and place the canvas upside down on top of it.  Fold the wadding up and over the edge and staple it.

DSC06005

2.  When you get to the corner, just cut a piece out to reduce the bulk

DSC06006

3.  Fold the corner and keep stapling

DSC06007

4.  That’s it – all done!

Here is mine with my latest block all set out ready to go to the machine

DSC06009

and look –  you can even turn it upside down and the pieces don’t fall off!

DSC06011


They won’t even end up on the floor if someone opens the door and the wind rushes in!

It is really something to think about if you don’t have one as it literally only takes minutes to make and it can it save you a lot of grief.  It doesn’t take up much space next to your machine and you can easily see that you are joining the right pieces!

I’d love to know if you think you will make a design board too!

Until next time

Nanny xx

Please share:

  • Share on Facebook (Opens in new window) Facebook
  • Email a link to a friend (Opens in new window) Email
  • Share on X (Opens in new window) X
  • Share on Pinterest (Opens in new window) Pinterest

Filed Under: CRAFT ROOM, NANNY CHAT, TIPS/TOOLS Tagged With: Make a Design Board, quilting, The Farmer's Wife 1930s Sew Along, Tips and Tools

Dream to Achieve – Walking Foot Quilting Ideas

August 15, 2015 by Nanny 7 Comments

alans pen logo Logo for Margie done

'Dream to Achieve' I'm Quilting Along With Nanny

Hi!

Today I thought I would share some Dream to Achieve – Walking foot quilting ideas.

It is such an exciting time – you have cut, pieced and stitched all the pieces together and you have basted the finished top, batting and backing and then you think EEk how will I quilt this?

Quilting design is such an individual thing but I think the following things are important to consider:

1. Does the quilt design lend itself to heavy quilting or selective quilting?

2. Heavily quilted quilts will not be as ‘cuddly’ as a less quilted one.

3. There are so many lovely quilting designs available but does your favourite one suit the quilt you are working on. eg would you put ‘feathers’ on a sharp,geometric design?

4. Will the chosen design ADD to the overall quilt design or will it ‘swamp’ it?

You really need to take a step back, breathe and look closely at your quilt top and fabrics involved and then consider your options.  You also need to consider your quiltig experience – if you have never tried Free Motion Quilting, I would suggest you start on smaller projects like placemats. to perfect your technique.

Today I will be looking at quilting with your walking Foot.  Many think you can only sew straight lines with a Walking Foot, but with a little thought , many options are available to the quilter.

If we look at the original Dream to Achieve quilt, you can see the following – all done with a walking foot:

1.  Following fabric design lines:

lines

lines2

2.  Using a shape to make a template:

hands

DSC05840

3.  Following fabric design curves:

DSC05841DSC05842

4.  Choosing overall to compliment the fabric design – turtle/water

turtles

waves

Now to my current Quilt Along Quilt:

blocks

butterflies

stripe

I think I will use the circles and squares shapes in the first fabric, the wavy lines from the stripe and maybe do something with the butterflies!

We have already stitched in the ditch around all sashing and so we have smaller blocks all secured and ready to quilt!  I will use the small areas to show you some options that you may like to try!

How to Sew Straight Lines with your Walking Foot

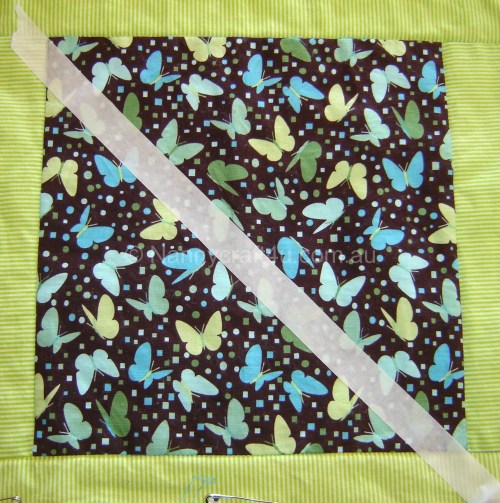
If you want to sew a line eg from corner to corner, the easiest way to mark your line is with masking tape.  Just remember to place it just to the side of the required line to allow for the stitching:

`   DSC05868

I will now add another diagonal to complete this square!

DSC05866

DSC05867

How to sew more than one line with your walking foot:

Once you have your straight line, it is easy to add more by

a) adding more tape at required distance OR

b) using the width of your walking foot and moving your needle  OR

c)  using a quilting guide.

With your walking Foot, you would have seen a piece like this:

DSC05845

You just lay it across the slit at the back

DSC05847

and press down until it clicks into place

DSC05846

Now you just slide it across to the width you want and sew with the guide following along the straight line you started with!

So I am setting my gauge at the same width as the finished sashing so it will be easy to see – I quite like the way it looks! I started at one edge using the same method as in the previous post.

DSC05869

DSC05870

Now of course you can add more lines if you want to – I have decided to leave it like this.

How to use the  width of the walking foot:

I will do another one now using the width of the walking foot to sew around the edge of the square and then I will freehand some lines across and down:


DSC05878 - Copy

DSC05879 - Copy

In this one I will sew a diagonal using the tape and then, using the width of the walking foot, spiral around each triangle:

DSC05877 - Copy

DSC05883

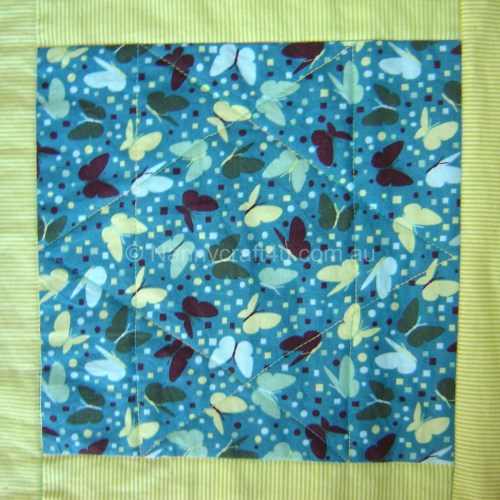
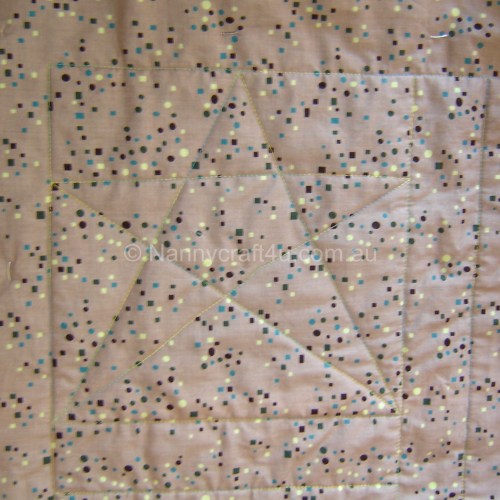
How to sew a 6 pointed STAR with your walking foot:

Maybe you would like a star!  Divide all sides in half and the right and left sides into quarters.

DSC05871

This is sewn in one motion, starting and ending on the left side.

DSC05873 DSC05876

How to sew a more WONKY STAR with your walking foot:

Maybe you would prefer a less structured star! Divide the top in half and the sides into thirds (approx as this will be determined by how wonky you want it) and start and finish in the left bottom corner.

DSC05872

DSC05874

DSC05875

How to sew a SQUARE SPIRAL with your walking foot:

Now I’m thinking a spiral – let’s start with the square and using our guide set at the same width as before:

squarespiral DSC05849

How to sew a CIRCULAR SPIRAL with a walking foot:

Now to try a circular spiral!

Trace a circle that fits the space (Im using a plate and tracing it using a sliver of soap)

DSC05850

I will start sewing from the centre at the top:

DSC05851

DSC05852

Now for the long blocks, I’m going to do wavy lines, so I will roll the quilt from both sides (like we did here) and just wave my way from one edge to the other

DSC05855

DSC05881 - Copy

DSC05882

For the feature stripe, I am going to some butterfly shapes!

I hope this has given you some ideas for quilting your quilt using a walking foot!  Don’t forget to share a photo in the Facebook Album of Flickr to be in the next Gift Pack Draw!  Great going!  You are nearly finished – just the binding to go – well done!

Until next time

Nanny xx

Please share:

  • Share on Facebook (Opens in new window) Facebook
  • Email a link to a friend (Opens in new window) Email
  • Share on X (Opens in new window) X
  • Share on Pinterest (Opens in new window) Pinterest

Filed Under: QUILTING TUTORIALS, SEWING/QUILTING Tagged With: Dream to Achieve, Dream to Achieve Walking Foot Quilting Ideas

Spin the Pins – Make a Hexie Bag

August 3, 2015 by Nanny 14 Comments


Spin the pins


Hexie Bag

As you would now be aware, I co-ordinate fabric swaps for Australian residents through my Facebook page ‘Nannyswapz’.  

When planning a swap with hexies, I try to find a project by spinning the pins so that participants have a purpose in mind before the swap proceeds. On my Hexies board I found a hexie bag that used 16 hexagons and so built our swap around that.  We  swapped Rainbow Batik hexies and I am going to use them to make  my hexie bag.  So here is my Spin the Pins – Make a Hexie Bag!

DSC05767

I decided that rather than sewing the bag and then lining it, I would hand stitch each hexie and then join them.  I also decided to make my own version re the shape and so made another 4 hexies to give me a total of 20.

What you need:

20 x 2.5″ (side) hexagons  ( Hexie Bag Templates)

20 x 2.5″ (side) hexagons of Vilene

20 x   hexagons      (Hexie Bag Templates

Matching thread

Finished size:  Approx 15″ x 13″ at the centre and 9″ at the sides plus handle

Let’s Sew!

1.  Iron the vilene to the back of the hexies

2.  I then machined around the outer edges

3. Centre that hexie , wrong side to wrong side on one of the larger hexies.  I used a large needle through the centre to hold them together.

DSC05738

4.  Fold the edge of the large hexie into the edge of the smaller hexie and finger press.

DSC05739

5.  Fold over again and pin

DSC05740

6.  Take a threaded needle and knot the end.  Concealing the knot, start stitching about 1″ from the corner (or from my finger in the photo) and stitch to about where the stitching line will be on the next side.

7.  Fold the next side the same way, making sure that the corner forms nicely.

DSC05787

8. Continue in this way until you are all the way around.  Finish off and slip the needle through the border to finish.

9.  Complete all 20 hexies in the same manner.

DSC05765

10.  Play around with the hexies  until you are happy with the setting out of  2 flower shapes (the front and back of the bag)

DSC05785


DSC05766


11.  Take the centre hexie and one other.

DSC05781

12.  With right sides together, stitch along one edge. (I used a whip stitch)

DSC05783


13.  Take the next hexie (yellow) and join the edge to the centre hexie (aqua)

DSC05782

14.  Continue joining all of the hexies to the centre and then join along the adjoining sides to complete the ‘flower

15.  Repeat with the other ‘flower’

16.  Now from the other 6 hexies, choose two to go on the end of the flowers:

Here

DSC05788


and here

DSC05789

17.  Take the 4 and stitch the pairs together

DSC05790


and then join them to the ‘flowers’

Like this:

DSC05792


and this:

DSC05793


18.  Now join the two ‘flowers’

DSC05791


and the complete the ‘circle’ by joining here

DSC05795


19.  Now you get to make a choice – how do you want your bag to be finished?

With the handle coming from the centre? (from the yellow)  If so, you will add the other two hexagons as shown.

DSC05796


On the other hand, you may prefer your bag handles to come from the sides like this.  If so you will add the extra two hexagons as shown.

DSC05797


I am making my bag for a specific reason ie to hang on the arm rest in the motorhome to hold my knitting, (It really is time for that shopping bag to go), and so

I have decided to have my handle come from the centre of the bag. This will ensure that it hangs ‘flat’ and not protrude into the walkway.

One side

DSC05800

and the other

DSC05799

20.  To make your handle, you will cut a strip 3″” x  twice the length you want it to be plus 0.5″.  I measured mine and will make it 16″. This will also be a good length to hang over my arm when taking it outside to crafting sessions.

DSC05801


21.  Cut a piece of vilene 2.5″ x the length of your handle and iron it onto the wrong side

DSC05815

22.  With right sides together, sew around the edges leaving a space to turn it through. Clip corners.

DSC05816


23.  Turn to right side, roll seams between your fingers and thumbs and press.  Stitch around the edge 1/4″ from the edge and then some rows of stitching the length of the handle.

DSC05817

24.  Join handle to the bag. I’m using whip stitch again.  You could, of course, stitch it to the top hexie using your machine if you prefer.

DSC05818


Now to load it up with my knitting needle roll,  a pair of snips, a needle size gauge and a darning needle and my current project – all that I need, exactly where I need it!

DSC05819


Perfect!!  Start the engines PJ – Nanny is ready to hit the road.

DSC05821


Until next time

Nanny xx


Please share:

  • Share on Facebook (Opens in new window) Facebook
  • Email a link to a friend (Opens in new window) Email
  • Share on X (Opens in new window) X
  • Share on Pinterest (Opens in new window) Pinterest

Filed Under: BAGS,POUCHES,ROLLS,WALLETS, NANNY CHAT, QUILTING TUTORIALS, SIMPLE PROJECTS, TRAVEL Tagged With: handstitching, Hexagon bag, hexagons, nannycraft4u

Re-purpose A Spice Rack

July 19, 2015 by Nanny 3 Comments

Hi!

I thought it time I found a purpose for some more of my Op shop stash!

Some time ago now, I picked up this Spice Rack – nothing exceptional but I was sure I could make good use of it, so today I am going to re-purpose a spice rack.

DSC05508


I thought I would get Poppy to paint it white for me, so while he was off doing that i got thinking!

After searching through the kitchen cupboards, I discovered that I could fit four glass tumblers neatly in the rack

DSC05525


I thought of covering them with fabric or even contact but was looking for a faster, more simple solution – why not try aluminium foil?

DSC05528


I ripped off a piece of the aluminium foil and wrapped it around the tumbler

DSC05530


I folded the top into the tumbler and pressed it firmly

DSC05531


I twisted the bottom

DSC05532


and then flattened it into the curve at the bottom of the tumbler

DSC05533


To give it a touch of ‘interest’, I gripped my hand around the tumbler and twisted carefully

DSC05534


Mmmm that’s different!!  If ever I feel the need for change it certainly will not be hard to dispose of the aluminium foil.

The paint dried and Poppy screwed the rack to the wall and I now have a simple storage solution for my Rotary Cutters – right where they are needed –  over my cutting table.

DSC05768


It looks great and fits nicely above my other op-shop find – my ruler storage that has been painted white as well!

Do you enjoy re-purposing items?  What has been your favourite Op-shop find?  I will have to venture out for another ‘shop’ soon!

Until next time

Nanny xx

Please share:

  • Share on Facebook (Opens in new window) Facebook
  • Email a link to a friend (Opens in new window) Email
  • Share on X (Opens in new window) X
  • Share on Pinterest (Opens in new window) Pinterest

Filed Under: CRAFT ROOM, NANNY and POPPY PROJECTS, NANNY CHAT, TIPS/TOOLS

Make a Light Box

July 9, 2015 by Nanny 16 Comments

I have always used a window to do my tracing, but with my back the way it is, I thought it time to come up with something more suitable.  I know I could ask Poppy to make a light box for me – you see many variations around, but I really didn’t want another piece to fit in to my overstuffed craftroom so decided to make a light box from things that are used around the house already.  Let me show you how to make a Light Box!

What you need:

A plastic storage crate (I store my fabrics in these)

DSC05749

A glass cutting board (found in the kitchen)

DSC05751

and an LED torch (from its charger)  You could use some of the little round ones from the cheap shop too if you wanted to spread the light more.

DSC05750

What to do:

1.  Place your plastic tub on your desk.

DSC05752

2. Turn on the torch and place it in the tub.

DSC05753

3. Place the glass cutting board on top.

DSC05754

4. Place your pattern on the cutting board. (You could tape it if you are worried about slipping)

DSC05755

5. Cover with the fabric pieces and trace away!!  (It was hard to photograph but all of the pattern is visible – you could slide the cutting board if you needed to)

DSC05756

How easy was that!!

It sits at a perfect height for tracing.  No more stretching up at the window for me AND when I’m finished it all goes away somewhere else in the house!  Just perfect for my Candlewicking Adventure!

Do you use a Light Box?  Let me know if you try this out and make a Light Box – I don’t know why I didn’t think of it before!

Until next time

Nanny xx


Linking to : Threading My Way,  Let’s Bee Social  Flamingotoes

Please share:

  • Share on Facebook (Opens in new window) Facebook
  • Email a link to a friend (Opens in new window) Email
  • Share on X (Opens in new window) X
  • Share on Pinterest (Opens in new window) Pinterest

Filed Under: CRAFT ROOM, NANNY CHAT, TIPS/TOOLS Tagged With: Light Box, Make a Light Box, nannycraft4u, simple project, tracing ease

  • « Previous Page
  • 1
  • 2
  • 3
  • 4
  • 5
  • …
  • 18
  • Next Page »

Welcome!

Welcome! I am Nanny and this is where I like to share my crafting as well as other snippets of our life in Australia. Read more

Social

Follow me on:

Like a Newsletter?

My Button4u

grab button for Nannycraft4u
<div class="nannycraft4u-button" style="width: 150px; margin: 0 auto;"> <a href="http://www.nannycraft4u.com.au" rel="nofollow"> <img src="http://i1168.photobucket.com/albums/r482/Nannycraft4u/logo8-001.jpg" alt="Nannycraft4u" width="150" height="150" /> </a> </div>

Looking for something?

Australian Women Bloggers Directory by Blog Chicks

Subscribe to Blog via Email

Enter your email address to subscribe to this blog and receive notifications of new posts by email.

Follow on Facebook

Follow on Facebook

Favourites

  • Let's Sew 23 - How to make a simple Library Tote
    Let's Sew 23 - How to make a simple Library Tote
  • Curtain Tie Backs
    Curtain Tie Backs
  • Make a lined,ruffle top, drawstring bag.
    Make a lined,ruffle top, drawstring bag.
[instagram-feed]

Meta

  • Log in
  • Entries feed
  • Comments feed
  • WordPress.org

© Nannycraft4u

All content and images belong to Nannycraft4u unless otherwise indicated. You are welcome to link back to my blog, but you may not copy whole posts, tutorials or photos without my permission. Please give credit for my work and link back to the original post at Nannycraft4u.com If you use one of my ideas, I would love to know about it. Designs and tutorials are for personal use only.

Copyright © 2026 · Lifestyle Pro Theme on Genesis Framework · WordPress · Log in