• HOME
  • ABOUT
  • BLOG
  • CONTACT
  • FEATURES
  • PARTIES I LINK TO

Nannycraft4u

Make your handmade dreams a reality - Just ask Nanny!

  • CHARITY PROJECTS
  • TUTORIALS
    • BAGS,POUCHES,ROLLS,WALLETS
    • EMBROIDERY
    • HOME/DECOR
    • LET’S SEW
    • QUILTING TUTORIALS
    • SPIN THE PINS
    • TOYS
    • WOTZA WEDNESDAY
  • SEWING/QUILTING
    • SIMPLE PROJECTS
    • TIPS & TOOLS
  • RECIPES
  • NANNY CHAT
  • NANNY & POPPY PROJECTS
    • CRAFT ROOM
    • HOUSE
    • TRAVEL
Home » SEWING/QUILTING » Page 2

Make Half Square Triangles from Charm Squares

February 20, 2017 by Nanny 8 Comments

Today we are going to make a Variation of the 9 patch .  We will make Half Square Triangles from Charm Squares and add them to the 9 patch.  This will add more variety to our 9 Patch Sampler.


WHAT YOU NEED:

  • 4 x 5″ squares  Dark and
  • 5 x 5″ squares Light

LET’S SEW!

We are now going to make a Half Square Triangle – this is another shape that is used in many quilting designs and with careful measuring, stitching and trimming you will have no troubles!

1.   Take one Dark and one Light and on the wrong side of the Light, draw in the diagonal.

2.  Place it right sides together with the remaining Dark and stitch a scant 1/4″ either side of the line.

3.  Cut between the lines


You now have two half square triangles! That was easy wasn’t it!

4.  Now comes the trimming:

To make it easier, I have placed masking tape along the 45 degree line on my rule.

Nanny note:  I am going to show you two methods of trimming – you might like to try both and decide which works best for you!

Method 1

Take one of the triangles and place your rule so that:

  • the 45 degree line is along the stitching line so you can just see the stitching
  • the 4.5″ line on the rule is running down the left and meeting the other 4.5″ line at the bottom left .

Now trim along the edge that is showing (top right – sorry I already trimmed)

Press seam towards the dark and you should have a 4.5″ square.

Method 2

Press the seam towards the dark

Place the rule 45 degree line along the seam, moving it along till you can see 4.5″ both ways – mine runs down the left side and along the bottom and meet where they meet the 45 degree line. (see the green pencil)


Trim the 2 sides – top and right

Turn the square around and repeat the process to square it up.

This trimming is an important part of quilting – we keep squaring, trimming and checking as we go and this results in blocks that go together easily and end up the size we are after!

5.  Trim the other squares  3 Dark and 4 Light to 4.5″ squares

6.  Organise the squares:

Nanny note:  

When you join a half square triangle to another square, you will notice that the diagonal does not join into the corner of the other square – dont panic!  That is what is supposed to happen- it is the 1/4″ seam allowance for when you join to the next row.


Nanny note – pressing:  when you join a HST (Half Square Triangle) to another square ,  press so that the seams including the diagonal seam lie flat even if it means it will be towards the light square.

Sew and press your 9 patch.

Well done!

Next week we will continue using charm squares, strips and Half Square Triangles to make variations of the 9 patch to add to our Sampler.  Don’t forget to show us your blocks – I’m loving the different fabric choices!

Until next time

Nanny xx

Please share:

  • Share on Facebook (Opens in new window) Facebook
  • Email a link to a friend (Opens in new window) Email
  • Share on X (Opens in new window) X
  • Share on Pinterest (Opens in new window) Pinterest

Filed Under: QUILTING TUTORIALS, SEWING/QUILTING, TUTORIALS Tagged With: 9 patch, 9 patch sampler, charm squares, half square triangles, HSTs, quilt blocks, Quiltalong, sewalong

New Year Planning

January 26, 2017 by Nanny Leave a Comment

Hi!  We are going to start off the new year  planning to  make a  9 Patch Sampler.

Last year, as a part of the activity on my Nanny Sews and Crafts page on Facebook, we decided to have a beginners quilt block swap.

We made the same block each month and the ‘Queen’ for the month decided on colour placement and layout.

This resulted in some interesting results and lots of practice of those pesky 1/4″ seams!


So. to build on these newly acquired skills, rather than a swap this year, we are undertaking to make a  9 Patch Sampler quilt.

We would love it if you would join us!

Starting in February, I will post each block here on the blog and each tutorial will remain as a resource.

I hope you will join us as you make a 9 Patch Sampler of your own.

I can’t wait to see everyone’s fabric choices!

Until next time

Nanny xx

Please share:

  • Share on Facebook (Opens in new window) Facebook
  • Email a link to a friend (Opens in new window) Email
  • Share on X (Opens in new window) X
  • Share on Pinterest (Opens in new window) Pinterest

Filed Under: NANNY CHAT, SEWING/QUILTING Tagged With: 9 patch, Quiltalong, quilting, Sampler Quilt

Hexie Travel Kit Add On

December 13, 2015 by Nanny Leave a Comment

Some time ago I spotted a gorgeous travel kit for hexies in a wonderful series of tutorials on English Paper Piecing by Haley from The Zen of Making and quickly ‘pinned’ it to make ‘one day’. (I wanted to share my Hexie Travel Kit Add On so I contacted Hayley and she graciously permitted me to use her photos – thanks Haley!)

english_paper_piecing_part_3_final_02 english_paper_piecing_part_3_final_04


Imagine my surprise when soon after, I received a gift from an online friend that was exactly that kit!  I couldn’t believe it and felt so special!

Hexie Kit Add On

As some of you are aware, my Dad is in an Aged Care Facility and I visit with him most days.  I take my kit with me, and if Dad is having a ‘quiet’ day , I will sit with him and sew.

It was during this time, concerned about roaming hands and the welfare of residents (some of them move very quickly when you are not looking), I decided to plan some additions to the kit to make it better suit my needs and make my sewing experience ‘safer’ for all.

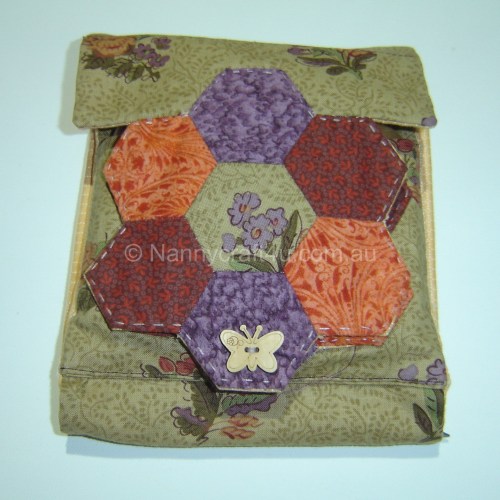
My friend had included some of the fabric in the kit so I used it to make a needle keep.  Of course it had to be a hexie with a hexie flower added!!  This fits perfectly on the back of the hexie flower flap and was easily hand stitched to the backing fabric.

Hexie Kit Add On 2Hexie Kit Add On 3


On the next section of the flap, I stitched a piece of cord to the flap using a button and added 2 jewellery 10mm Jump Rings – my thread is now secure but easy to change if I need another colour.

Hexie Kit Add On4


Then on the next section, I wanted to have a spot for some scissors or snips.  An easy solution was to stitch two ponytail elastics to the flap.  If you were doing this as part of the total construction, you could make a fabric scissor keep for here.

Hexie Kit Add On 5


The changes I made were quick and easy and I now have a fully functional travel kit with a secure place for everything I need.

Hexie Kit Add On 6


and it hasn’t changed the exterior of the original!

Hexie Kit Add On

I love my Kit and if you like to carry stitching with you – on the train, waiting for children etc etc then I would say get over to The Zen of Making and do yourself a favour  – make yourself a Travel Kit – you will not regret it and  you might even like to try my Hexie Travel Kit Add On!

Until next time

Nanny xx


Please share:

  • Share on Facebook (Opens in new window) Facebook
  • Email a link to a friend (Opens in new window) Email
  • Share on X (Opens in new window) X
  • Share on Pinterest (Opens in new window) Pinterest

Filed Under: NANNY CHAT, SIMPLE PROJECTS Tagged With: Hand stitching, Hexie, Hexie Travel kit, Travel Kit

Make a Pin Cushion Dish

November 4, 2015 by Nanny 6 Comments


Keeping on with the gift ideas, today I am sharing how to make a Pin Cushion Dish

I purchased these from the ‘cheap’ shop some time ago because they looked like something I could use!  🙂

They are dip bowls and as you can see, two for $5.99.

DSC05887

This is how I used them to make a Pin Cushion Dish!

What you need:

A dish

Scrap of fabric about 9″ square

Needle and thread

Filling

Glue  (I used a glue gun)

Ribbon to trim

Let’s craft!

  1. Trace around a bowl about 9′ or 23 cm in diameter

DSC05895

2.  Run a row of stitches around 1/4″ in from the edge – I did this by hand using double thread and starting with a knot.

DSC05899

3.  Gather it up

DSC05900

4. Stuff it with whatever you like in a pincushion – I used polyfill

DSC05894


5.  Check to see if it looks puffy enough and then tie it off.

DSC05901


6.  Using a glue gun, run glue over the base and around the upper edge of the dish and push the pin cushion into the glue.  I held it till the glue cooled.

7.  Trim with a ribbon scrap to cover the dish edge.  I joined the ends on the side facing the empty dish.

DSC05902

Make it in a favourite colour, add some pins or threads and  there you have it – a lovely, very useful (and very cheap) gift for the sewists in your life!

I hope this inspires you to look at simple objects in a different way – Take a dip bowl and make it  into a Pin Cushion Dish – who’d have thought!

Until next time

Nanny xx

Please share:

  • Share on Facebook (Opens in new window) Facebook
  • Email a link to a friend (Opens in new window) Email
  • Share on X (Opens in new window) X
  • Share on Pinterest (Opens in new window) Pinterest

Filed Under: CRAFT ROOM, SIMPLE PROJECTS, TIPS/TOOLS Tagged With: Dip dish pin cushion, Gift ideas, nannycraft4u, Pin Cushion

The Farmer’s Wife 1930s Set-Up

October 23, 2015 by Nanny Leave a Comment


GnomeAngel.com

Hi!

Today I thought I would show you some things that I will use to make my Sew Along experience more enjoyable – The Farmer’s Wife 1930s set-Up!

I would have loved to be doing my piecing on my Mum’s treadle machine, but my back condition will not allow that so I am going to use my Featherweight.  Here she is, set up on a table made using the bottom of my Grandma’s treadle machine (unfortunately, at a time in its life that it needed some serious TLC, my Uncle left a window open and the weather ruined Grandma’s machine – I was able to rescue the base and it makes a lovely desk in my craft room!)

Mum’s treadley is sitting right next to us so we will all be ‘together’ – Mum was born in 1930!

DSC05972


I will be using my sand paper/glass paper board when I have to draw diagonals etc

003-300x225

My pressing board will be a real necessity

DSC04068-300x225

and my design board will make sure my pieces stay in the correct order as I construct the block!

Make a Design Board

Of course I need my book The Farmer’s Wife 1930’s and my computer – add to that my scissors, rotary cutter and rulers and the odd pin and I think that should get me there!

I am behind the schedule now following my Dad’s recent health issues, but will continue to plod along, be kind to myself and know that I will get there!

These are the blocks I have completed:

#12  BECKY

DSC05975

# 16  BONNIE

DSC05977

#8  AUNT

DSC05976

and #20  CAROLINE

DSC06020


I am really enjoying the process and hope that you will enjoy following along on the journey with me!

Until next time

Nanny xx


Please share:

  • Share on Facebook (Opens in new window) Facebook
  • Email a link to a friend (Opens in new window) Email
  • Share on X (Opens in new window) X
  • Share on Pinterest (Opens in new window) Pinterest

Filed Under: NANNY CHAT, TIPS/TOOLS Tagged With: Design Board, Pressing Board, quilt blocks, sand/glass paper board, The Farmer's Wife 1930s Sew Along

  • « Previous Page
  • 1
  • 2
  • 3
  • 4
  • …
  • 18
  • Next Page »

Welcome!

Welcome! I am Nanny and this is where I like to share my crafting as well as other snippets of our life in Australia. Read more

Social

Follow me on:

Like a Newsletter?

My Button4u

grab button for Nannycraft4u
<div class="nannycraft4u-button" style="width: 150px; margin: 0 auto;"> <a href="http://www.nannycraft4u.com.au" rel="nofollow"> <img src="http://i1168.photobucket.com/albums/r482/Nannycraft4u/logo8-001.jpg" alt="Nannycraft4u" width="150" height="150" /> </a> </div>

Looking for something?

Australian Women Bloggers Directory by Blog Chicks

Subscribe to Blog via Email

Enter your email address to subscribe to this blog and receive notifications of new posts by email.

Follow on Facebook

Follow on Facebook

Favourites

  • Let's Sew 23 - How to make a simple Library Tote
    Let's Sew 23 - How to make a simple Library Tote
  • Curtain Tie Backs
    Curtain Tie Backs
  • Make a lined,ruffle top, drawstring bag.
    Make a lined,ruffle top, drawstring bag.
[instagram-feed]

Meta

  • Log in
  • Entries feed
  • Comments feed
  • WordPress.org

© Nannycraft4u

All content and images belong to Nannycraft4u unless otherwise indicated. You are welcome to link back to my blog, but you may not copy whole posts, tutorials or photos without my permission. Please give credit for my work and link back to the original post at Nannycraft4u.com If you use one of my ideas, I would love to know about it. Designs and tutorials are for personal use only.

Copyright © 2026 · Lifestyle Pro Theme on Genesis Framework · WordPress · Log in